Tech DIY
Running a Brake Line through a (WAO Arrival) Frame without Internal Guides
I don't harbour the same white-hot hatred of internally-routed brake lines as many, but I won't deny they are a colossal pain in the ass. This development takes the relatively simple job of installing or replacing a rear brake and adds several levels of complexity and hassle, and a minefield of potential setbacks. A brake bleed is all but inevitable, and you'll need to shorten your brake line, whether it needs it or not, because you'll need to reinstall a new olive and insert, into the newly cut line. If your frame has tube-in-tube construction to guide the line from one end of the bike to the other, inserting it into the frame can be straightforward. If it only goes partway, as in the Norco Sight VLT I recently wrestled with, it's less helpful. If there are simply ports for the brake line to exit and enter the frame, with no internal tubing, both on the mainframe and in the swingarm, you're in for more of an adventure. You'll also need to take some precautions to prevent the line and cable housing(s) from sounding like a cracked-out marching band clattering around the inside of your frame.
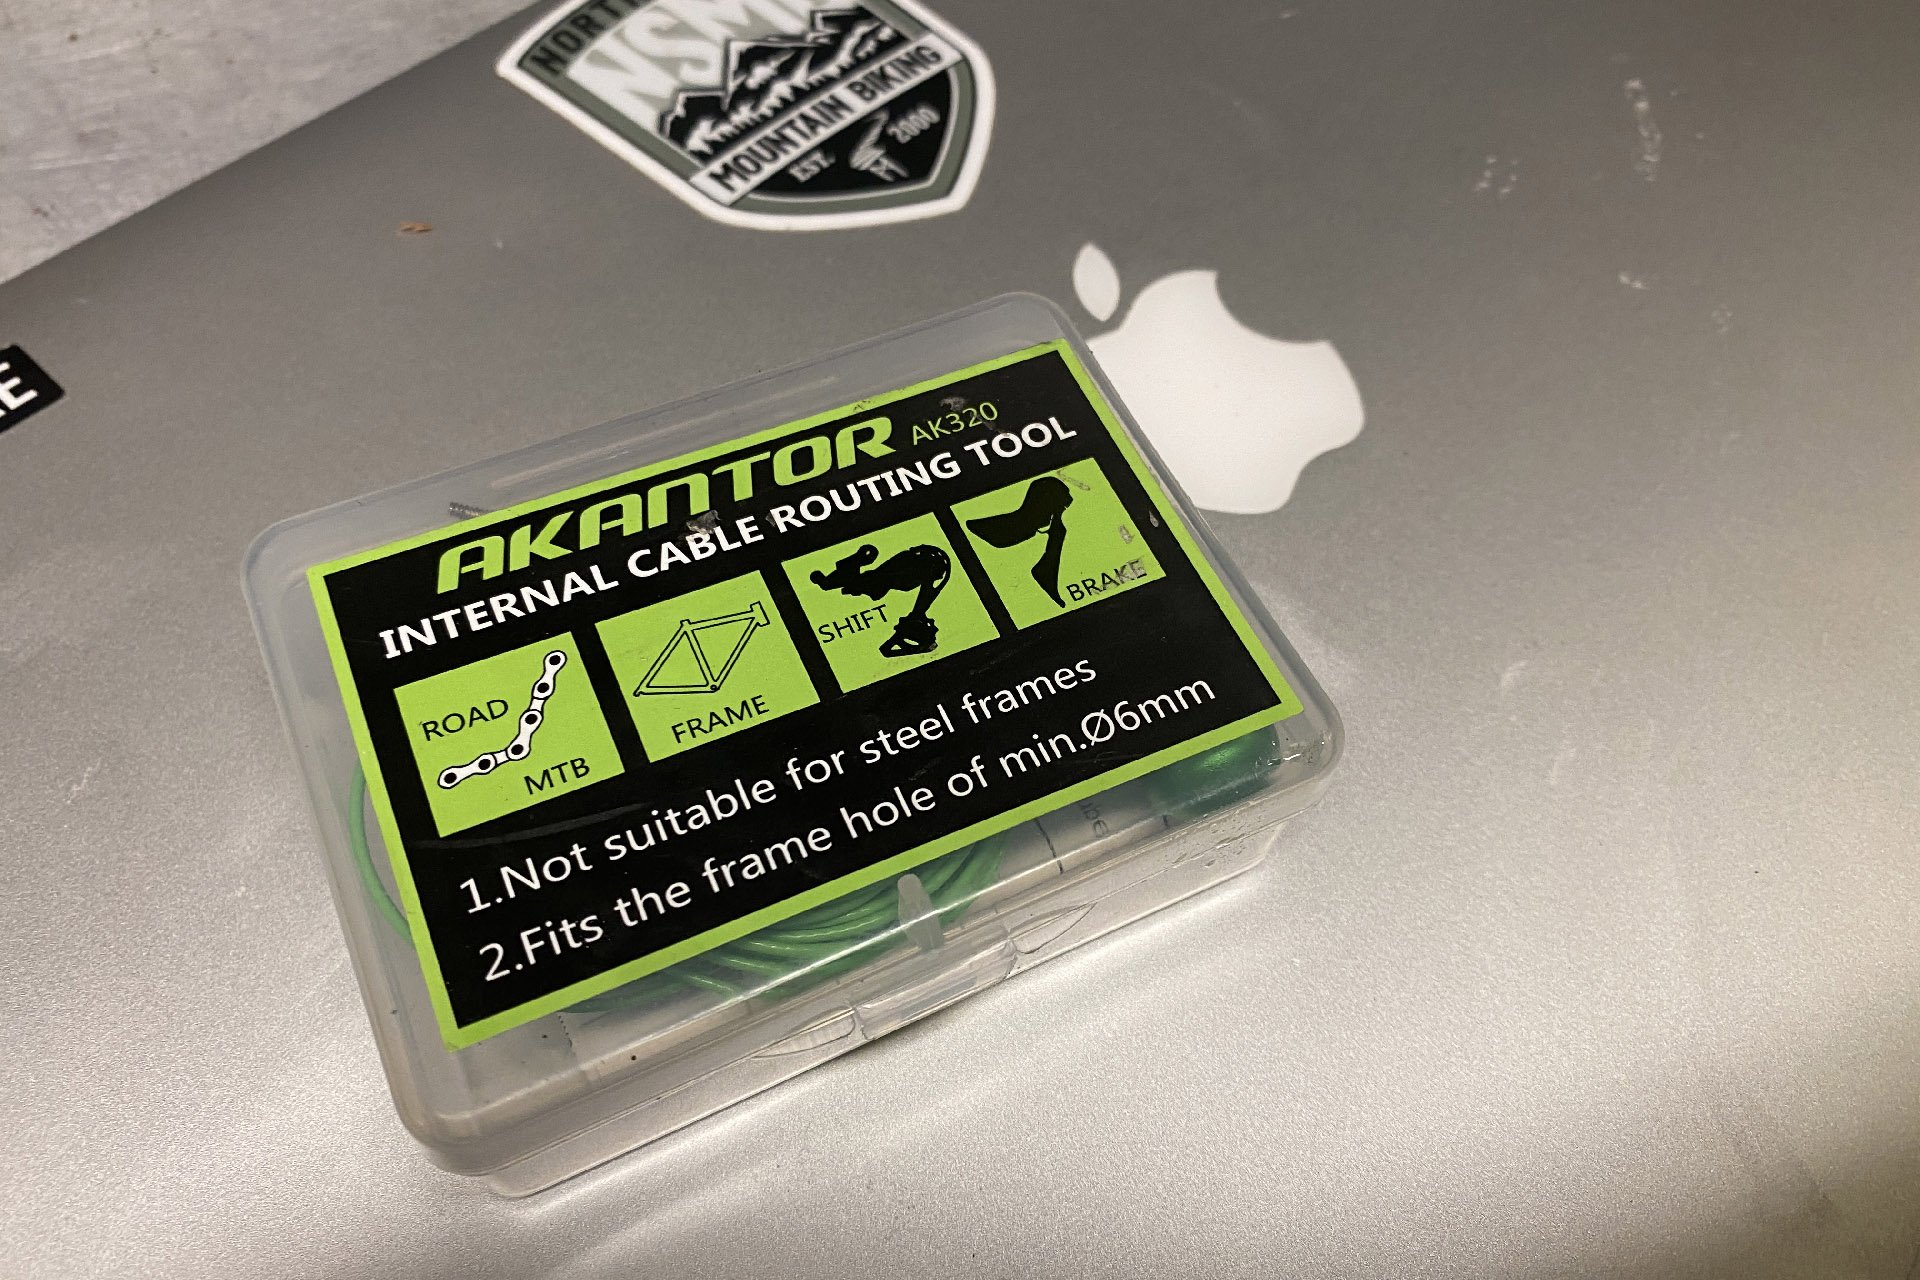
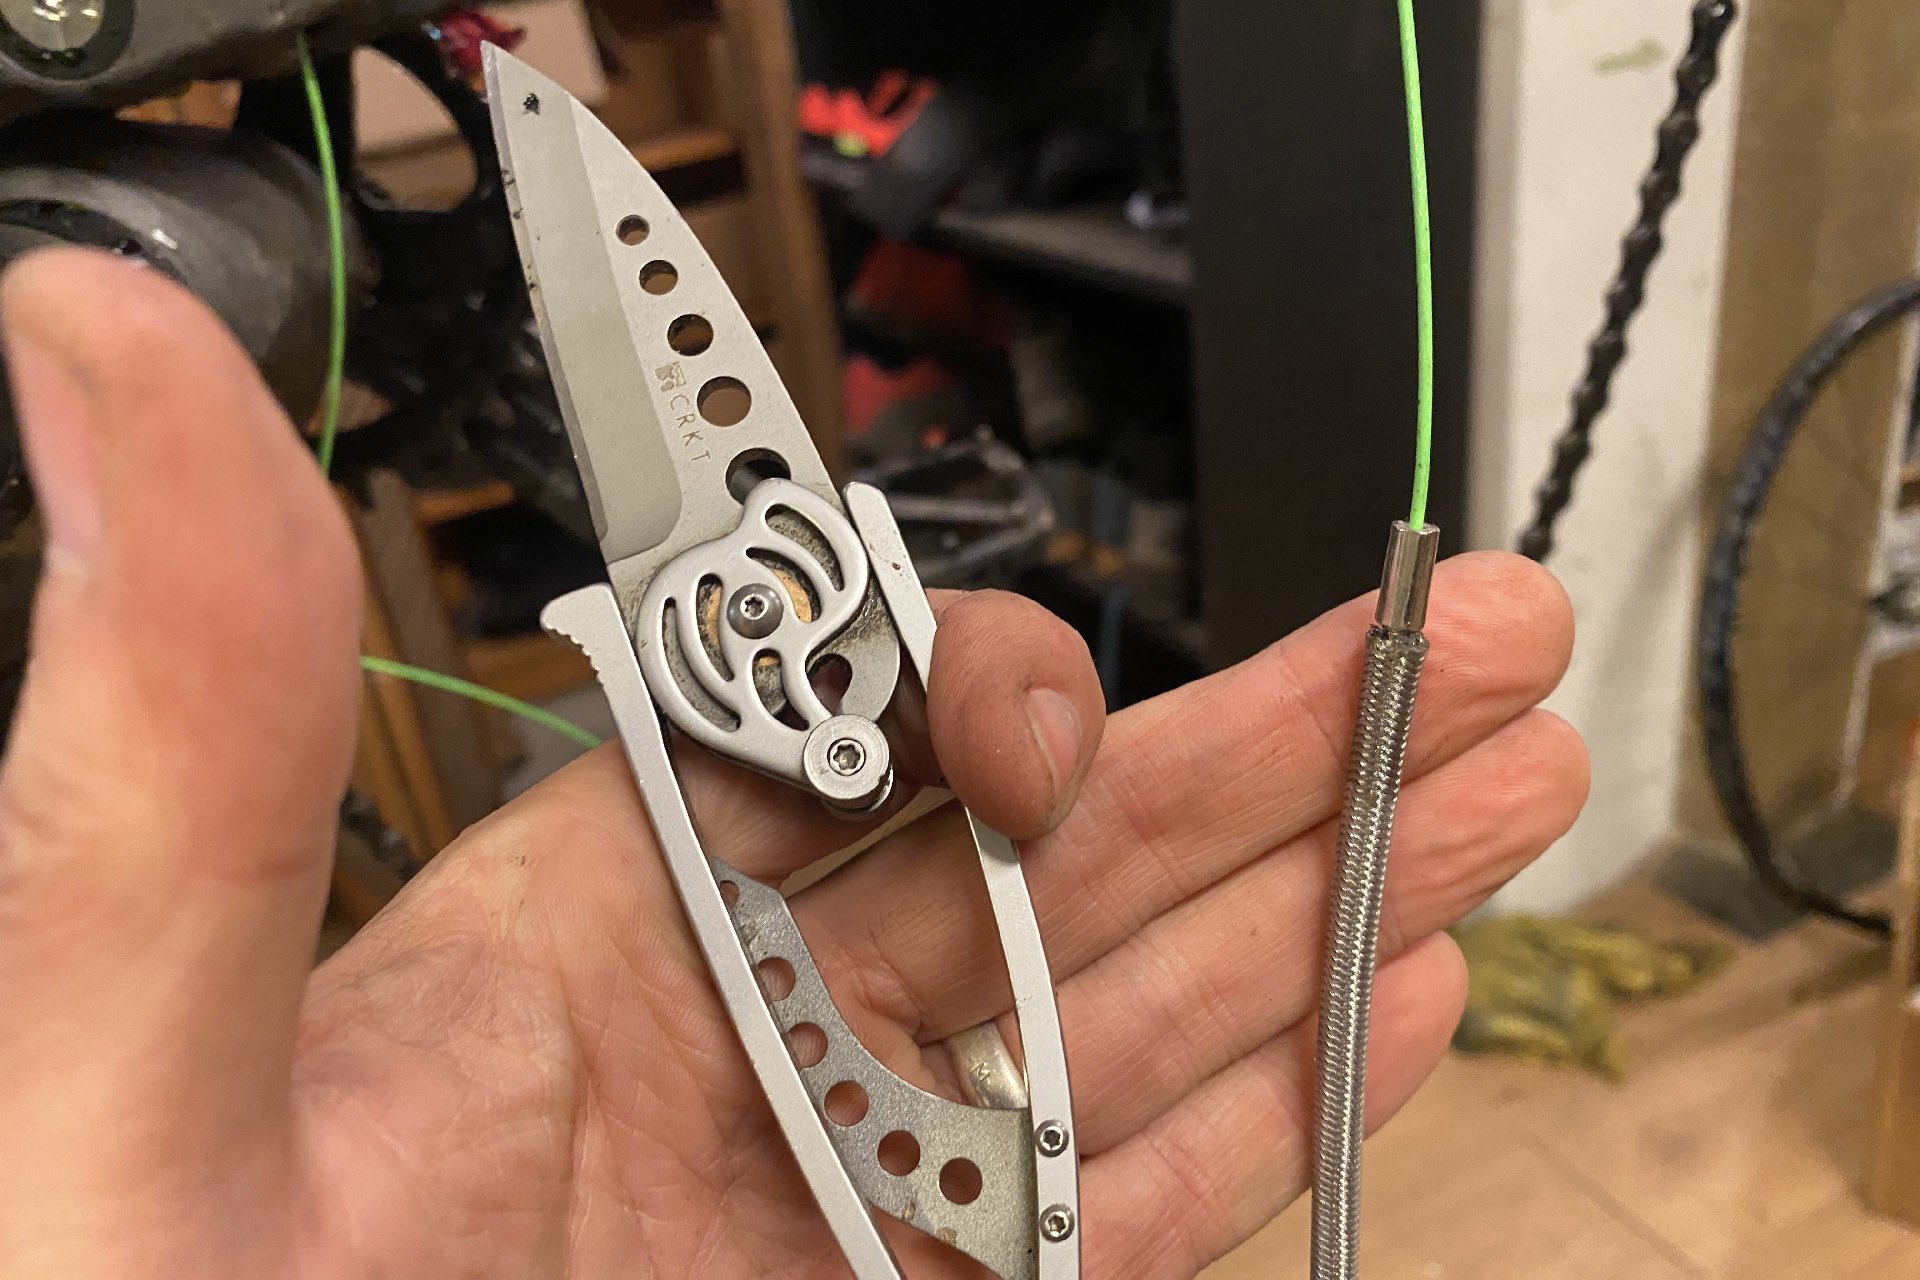
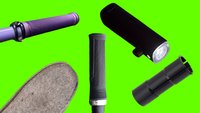
Actual product name for this tool from "Wallfire" on Amazon: "Wallfire M Internal Cable Routing Tool Internal Cable Routing Kit for Bicycle Frame Cycling Accessories Bicycle Repair Tool Internal Cable Routing Kit for Bicycle Frames." Despite all those passionately descriptive words, they somehow left off "Akantor," which means something in Sanskrit,* and the AK320 product designation. Which means nothing since there is no 310 or 420.
*actually it's "an exceptionally powerful Flying Wyvern" from what I imagine is a video game called Monster Hunters
If you were a smart racer, in the days before internal routing, and you had trouble with a brake on race day, you could have one already bled and cut to length and slap it on in five minutes. Now it's likely an hour unless you are a trained mechanic which means you are going to need a spare bike if the turnaround time is too short.

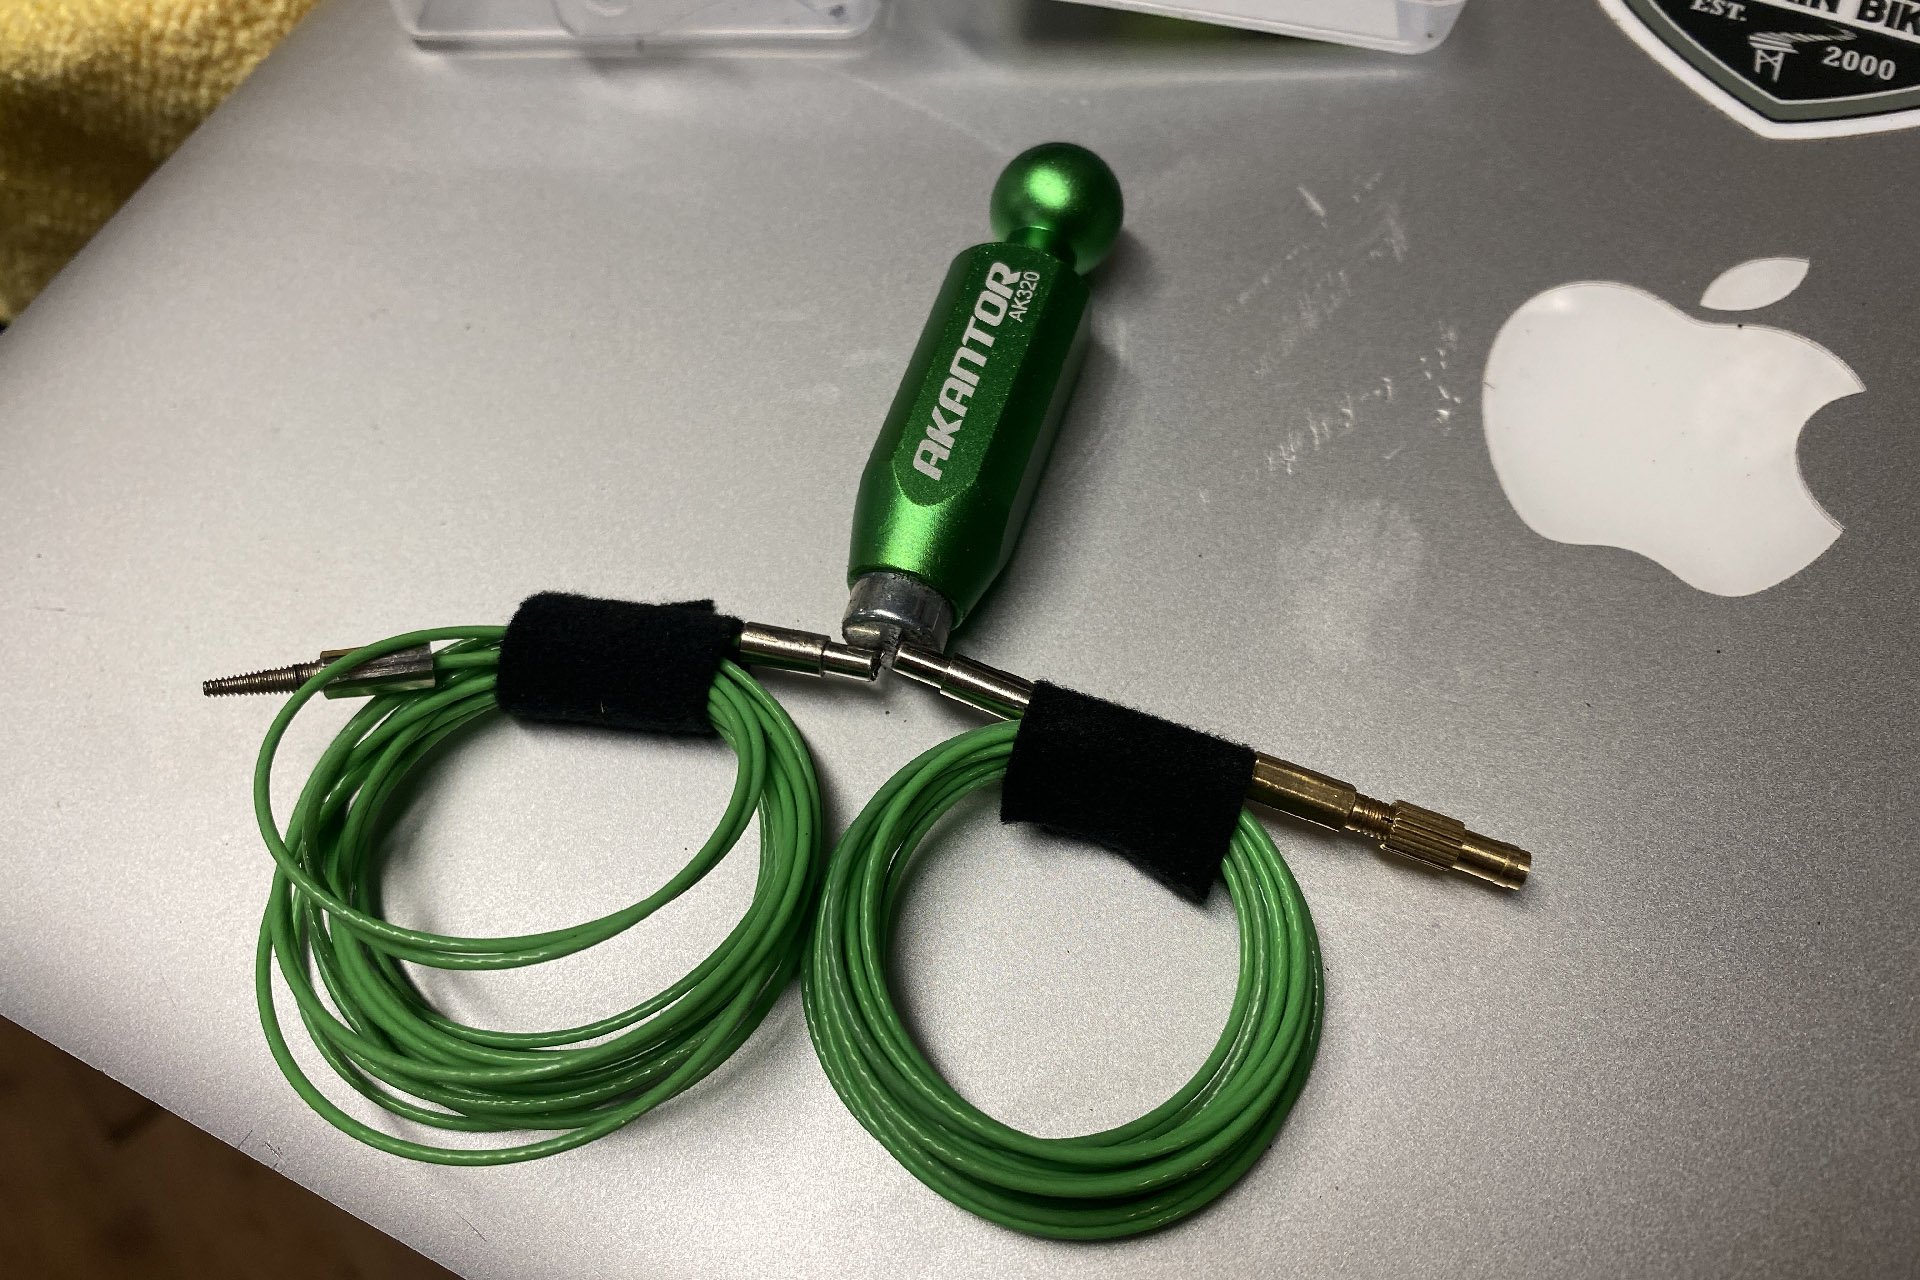
Park's tool comes with four different wires with magnetic ends that attach to either housing, hose, or wires. And I bet the magnet is more than strong enough as well. The AK320's magnet does the job, but just barely.
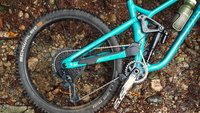
I have used the installation of internal lines and cable housing, without any special tools, as a sort of personal DIY challenge until this point, but the full-day build* of the We Are One Arrival frame, which I'll be using as a test platform, finally convinced me to get with the times. I’ve had several other adventures with internal routing lately, both with the Norco Sight VLT and the SCOR 4060 LT. Almost as soon as I'd built the aforementioned Arrival, and installed a set of SRAM Code RSC brakes, a pair of Hope Tech 4 E4 test brakes, which I expected to wait months for, magically appeared. I had Macguyver fatigue from the build a week earlier and I decided it was time to buy some skills in the form of the right tools.
*not entirely because of internal routing but partially
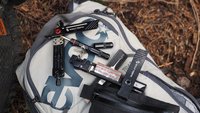
This is everything the Wallfire/Akantor AK320 comes with.
I knew of Park's internal routing kit but when I looked it up online I was a little put off by the price. Their kit, which includes a powerful magnet and four coated wires, sells for about 115 CAD. The coated wires have one magnetic end and the opposite ends are designed to attach to different types of hose, housing, and wires so these can be yanked through the frame.
When I first built up the We Are One Arrival frame, I did it without the help of magnetic tools. It was a pain and only possible (for me) without the fork installed.
The idea behind this tool is relatively straightforward. Once the magnetic end is inserted into the frame, you drag it along the inside of the structure, from the outside, using the large sceptre-shaped magnet, assuming your frame isn't made of steel. This sounds tricky but if you lose contact with the the end inside the frame it's obvious, because the magnet in your hand no longer sticks to the frame. But you are correct, it's a little tricky. Once the magnetic end emerges from the exit port, you attach your cable/hose/wire to the trailing end and then you just need to pull the whole thing through. It’s as easy as juggling live eels.
I didn't find any specific instructions for installing Hopes with braided lines (from Goodridge apparently) but I found a video which recommended stripping enough wire to easily accommodate the banjo.
The price of the Park tool likely makes sense for a bike shop, but I figured there might be a knock off on Amazon. I have little affection for Bezos's company and, in particular, its labour practices, but I am a sucker for convenience and cheap prices. I found the "Wallfire MTB Internal Cable Routing Tool Internal Cable Routing Kit for Bicycle Frame Cycling Accessories Bicycle Repair Tool Internal Cable Routing Kit for Bicycle Frames," for 27 Canuck bucks and bought it with one click. Which is actually two clicks. Clearly being deceptive about the number of clicks is profitable. And profit, as you may know, is everything.
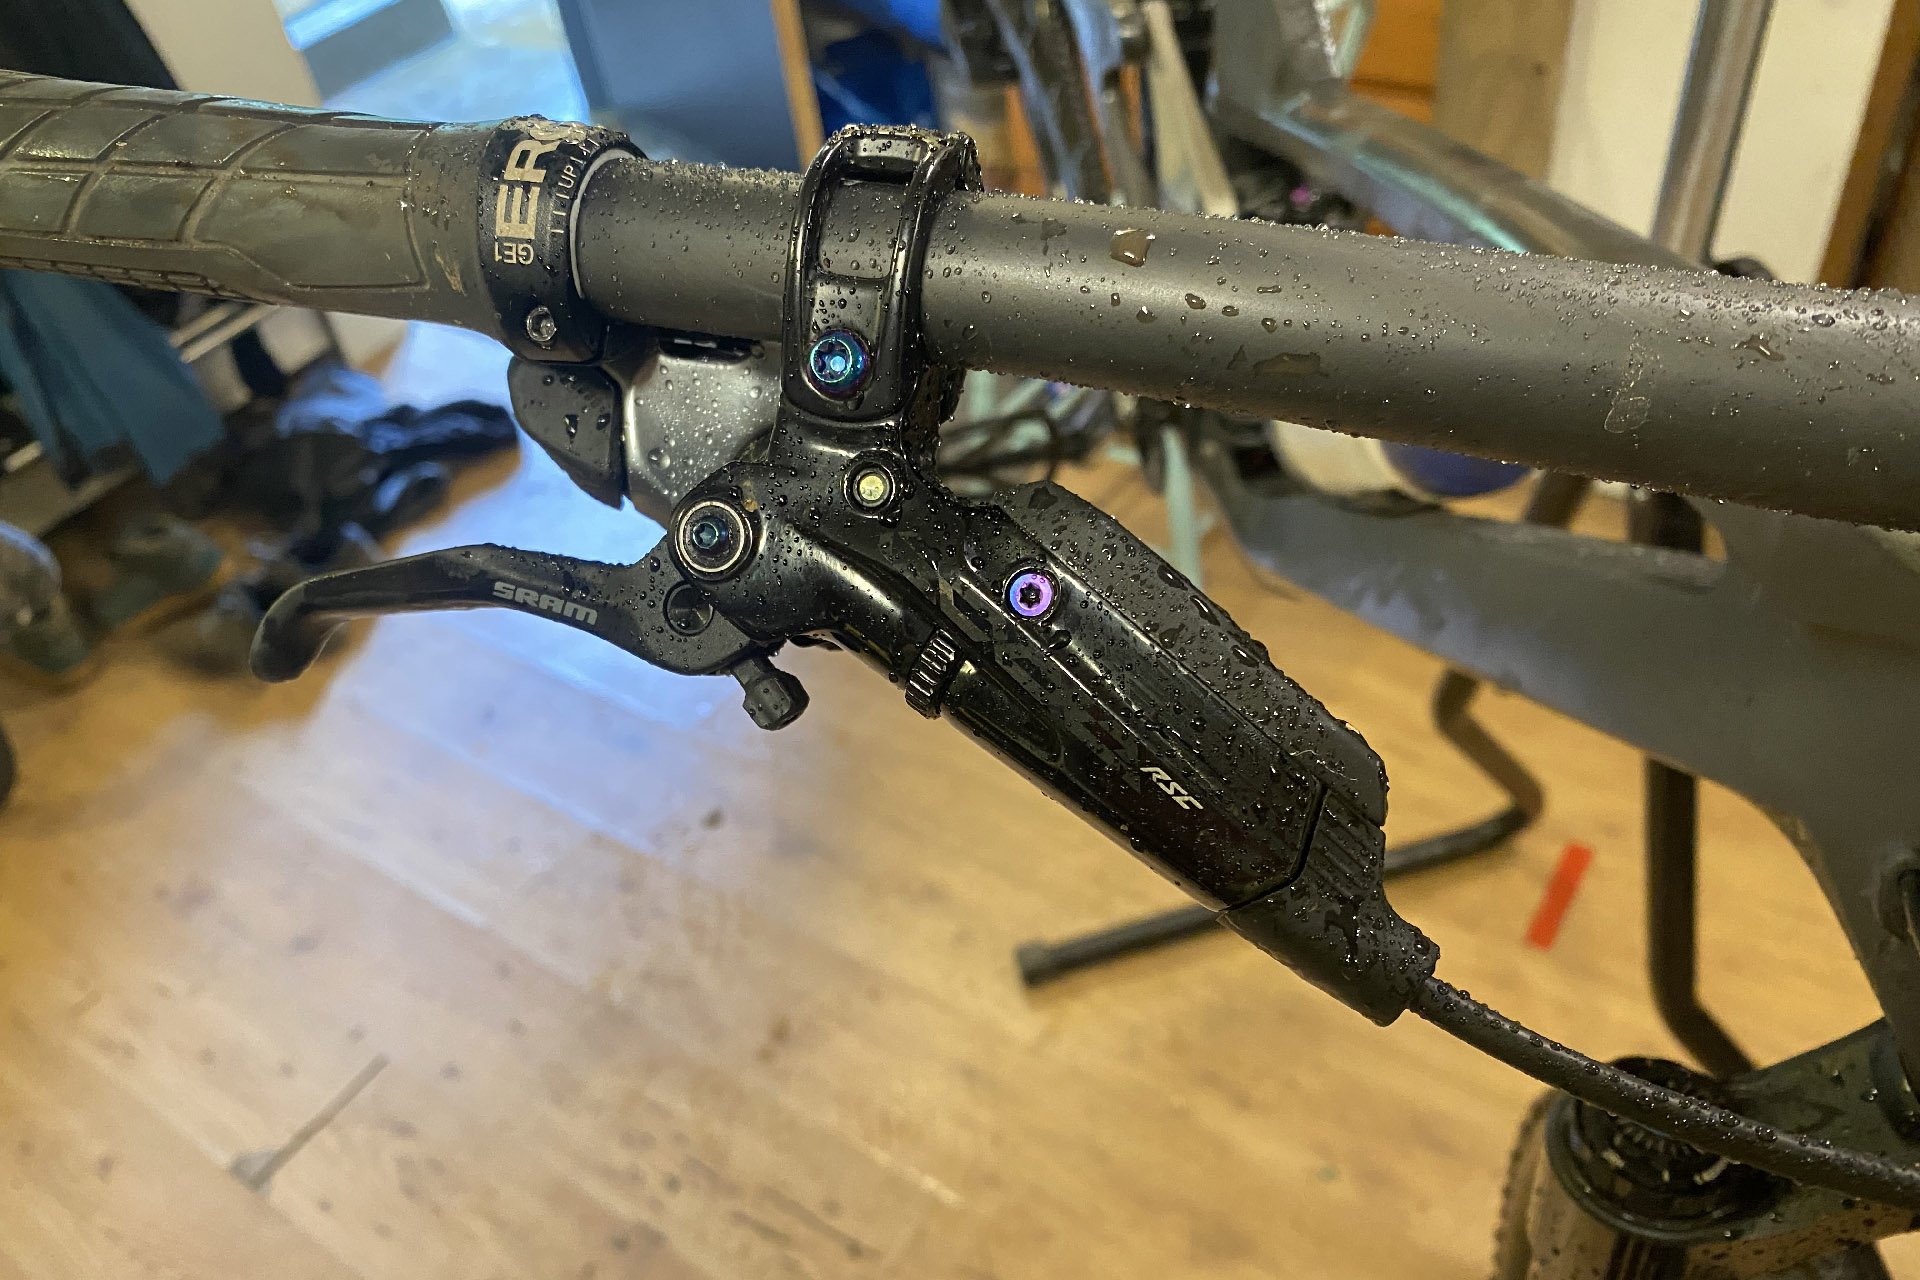
SRAM's Code brakes seem to be getting better over time, despite no huge overhaul recently. This set was the best I have used, and the others were already excellent. Great modulation and power and resistance to heat fade. I'm normally no fan of the oil slick finish but it looks great used only on fittings as it is here.
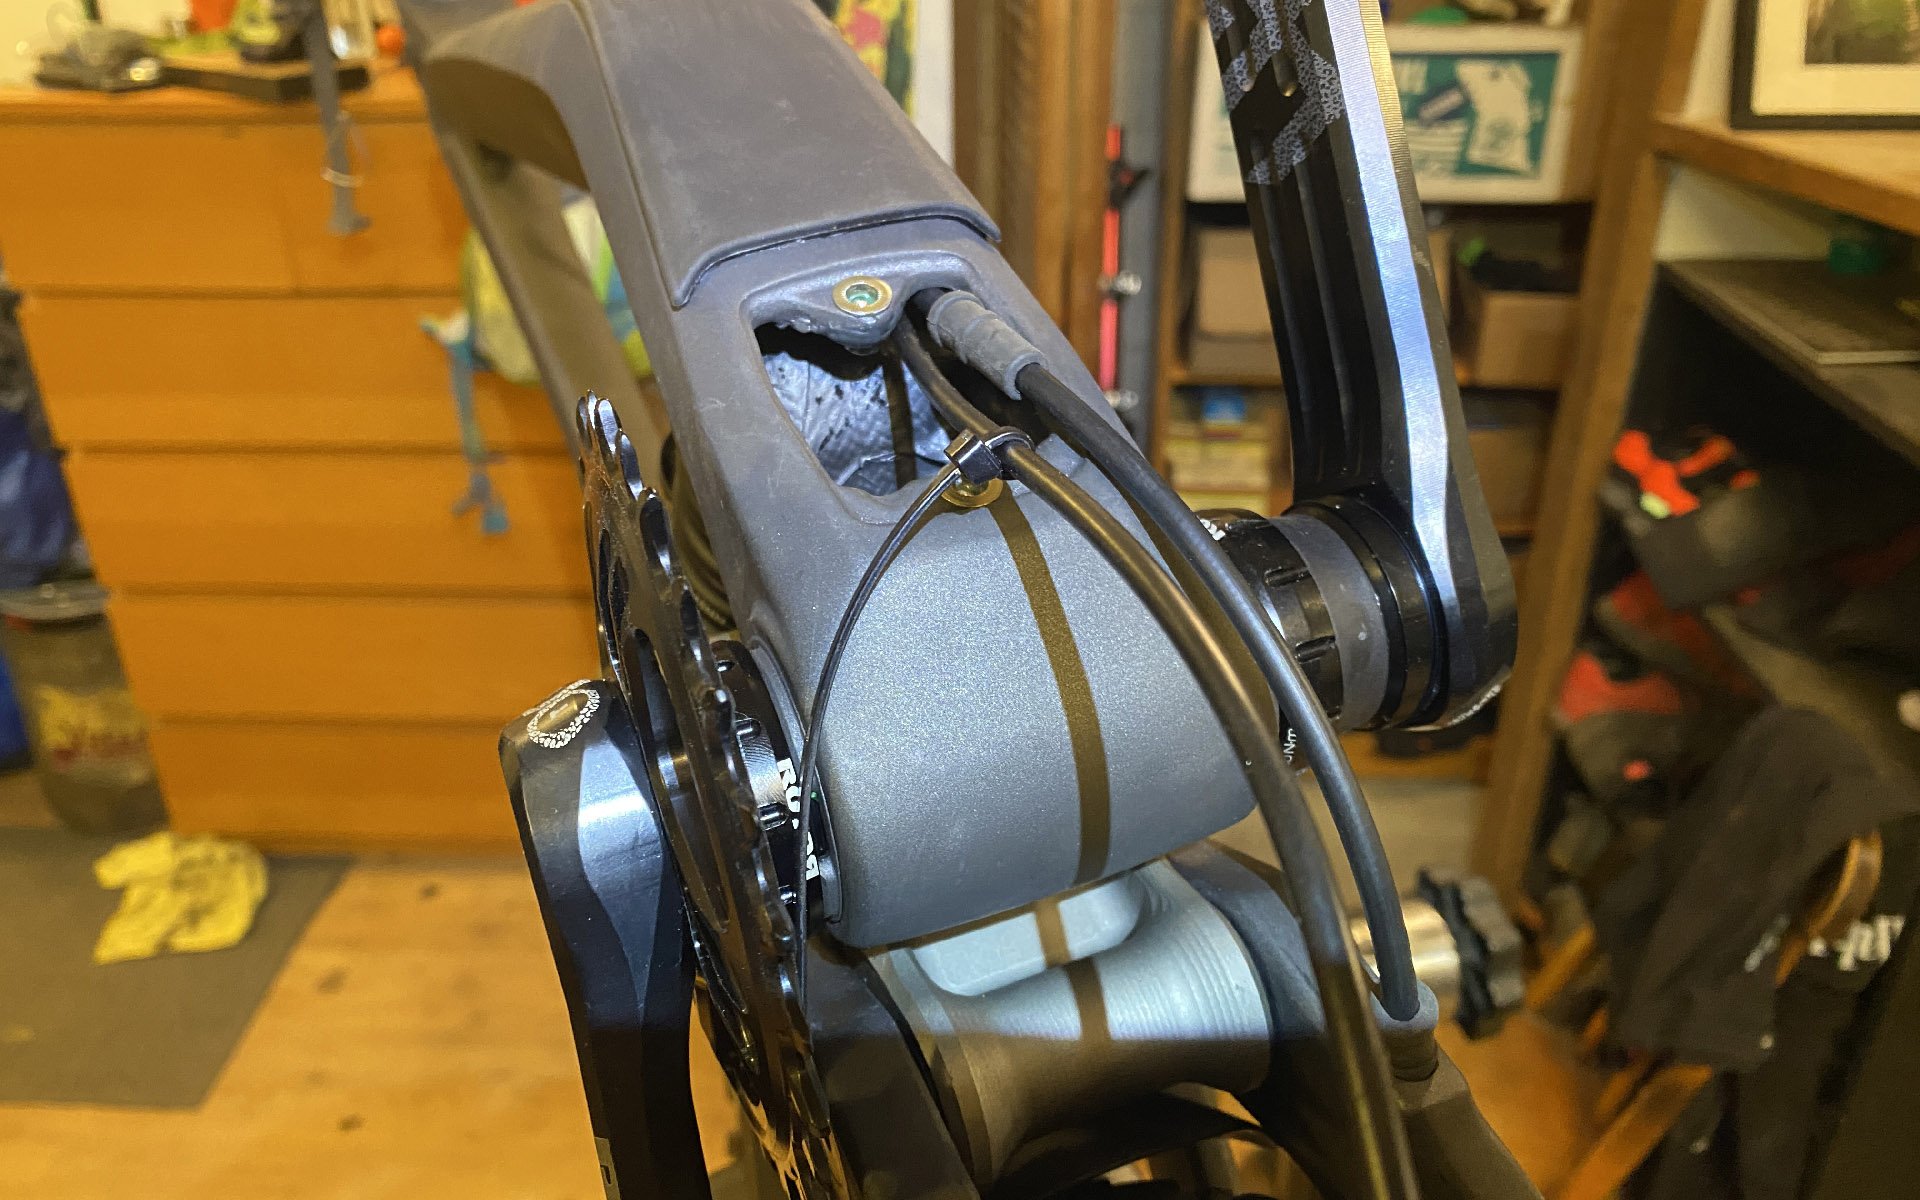
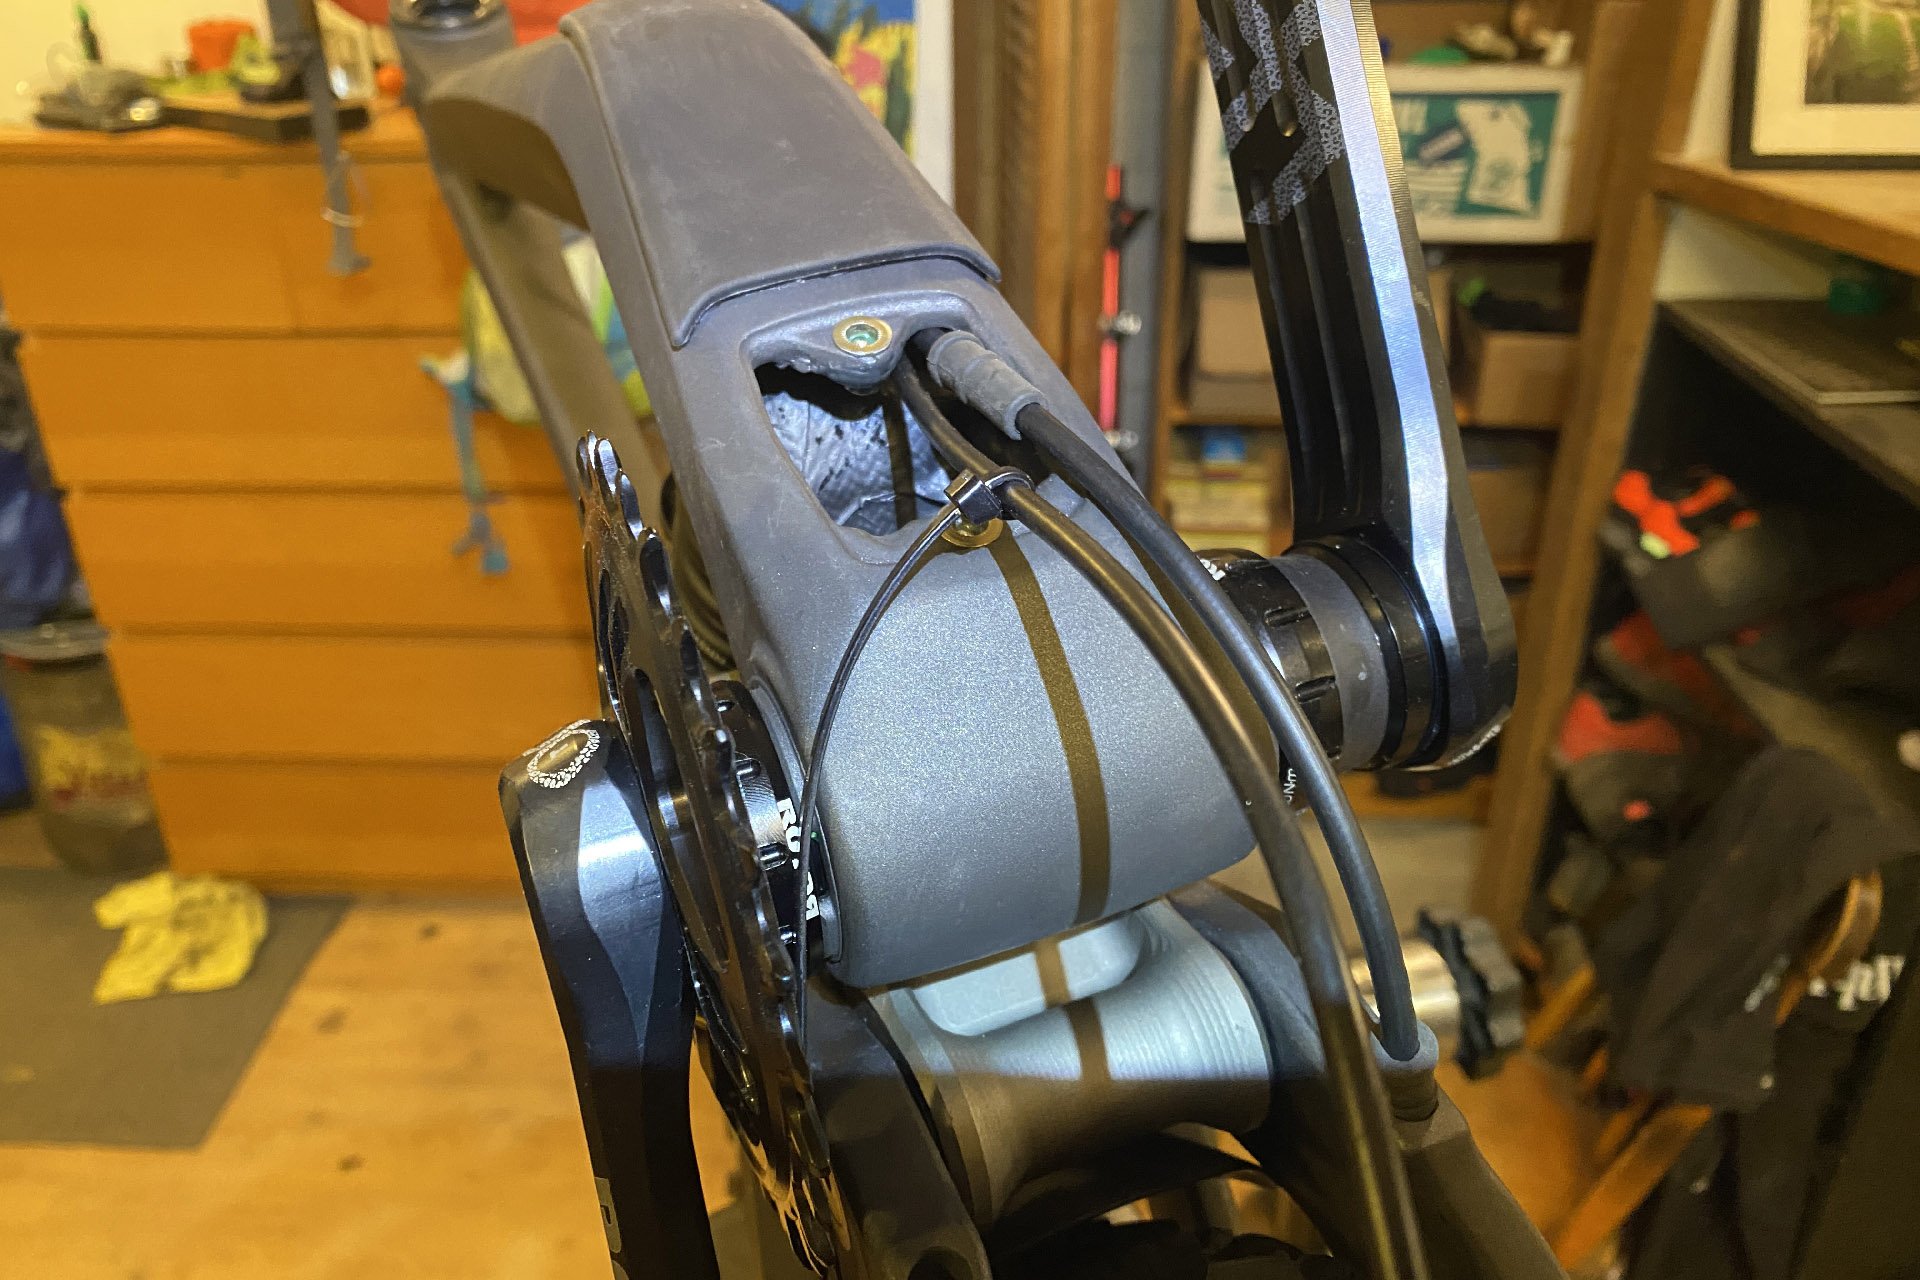
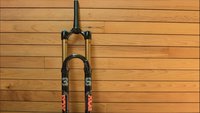
When I put a set of SRAM Code RC2 brakes on the Arrival, I attempted it before the fork was installed. Unlike Hopes, a SRAM brake line must go in from the rear of the frame because the banjo at the caliper end, which helps seal the line's connection, cannot be removed and replaced like the lever end (at least not by me). Using the void of the head tube for access, I was able to steer the brake line out into the fresh air, after a relatively long and frustrating struggle. With the fork installed I would not have been able to find the exit port at all. Even with that advantage, it was a tricky proposition with many frustrating detours, for both main frame and swingarm.
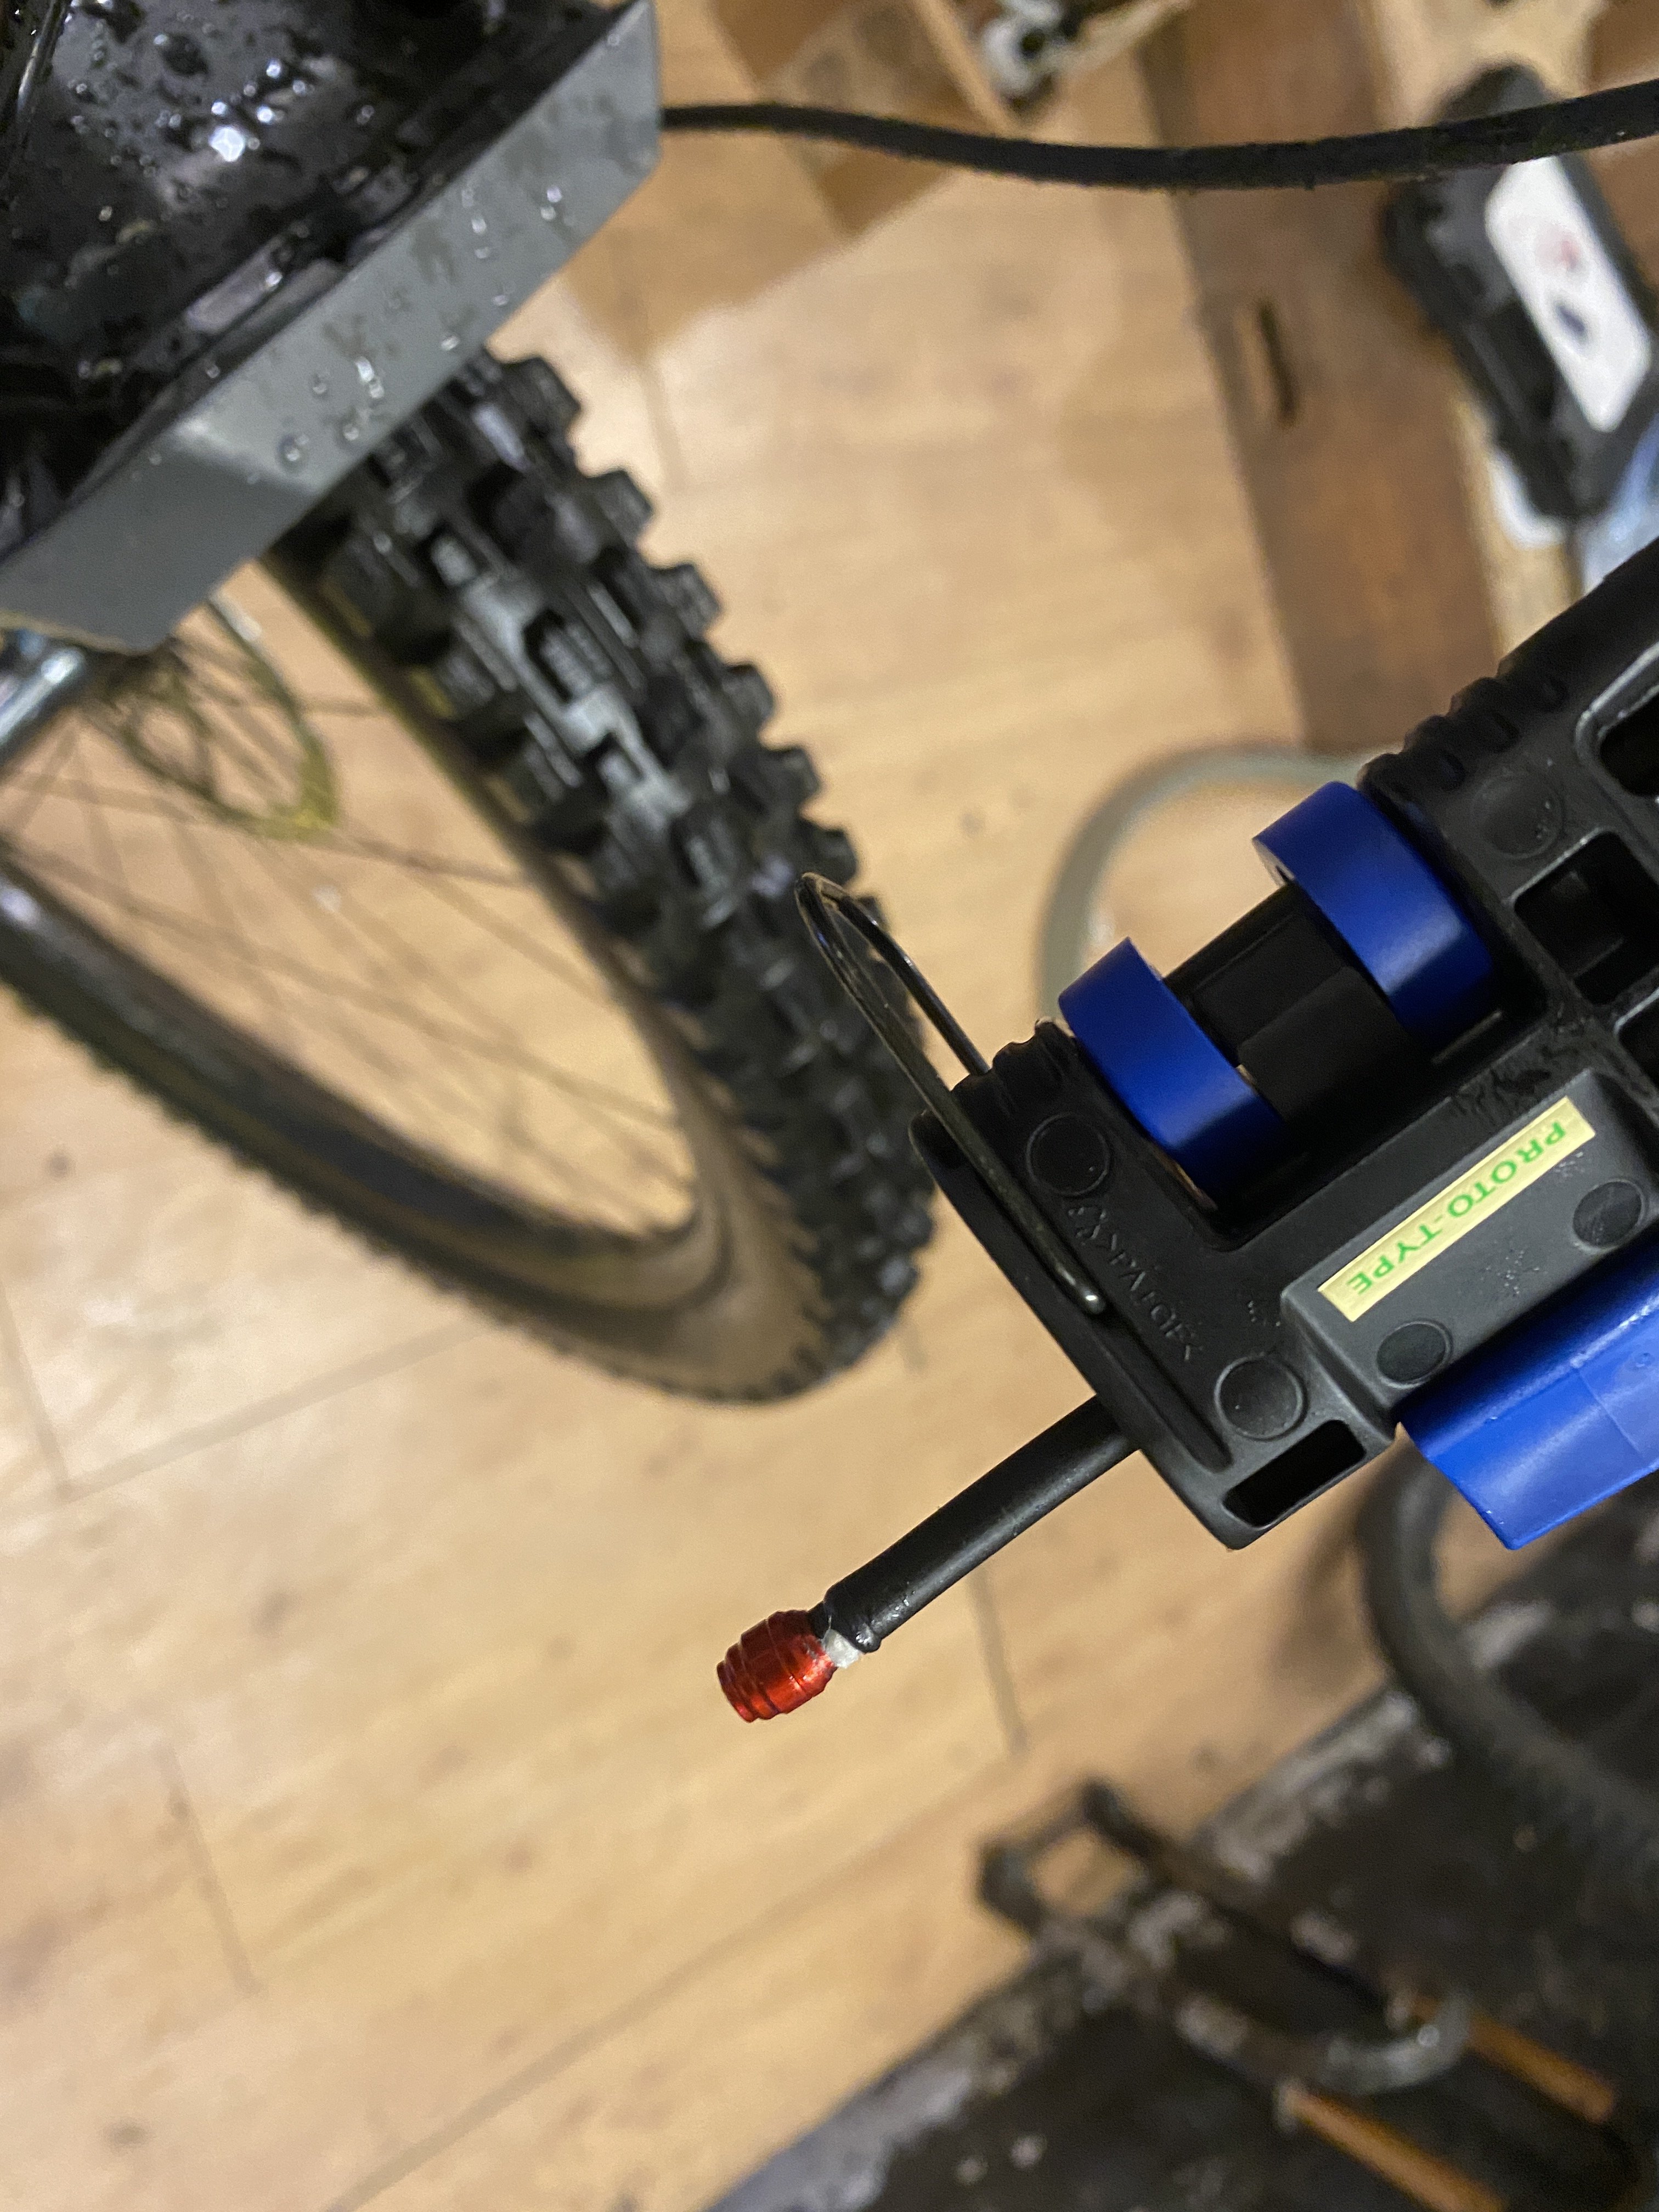
This tool from Shimano (apparently a prototype?) clamps the brake line and then presses the insert in.
Part one of the process with a tool like this is to use the guide magnet on the outside of the frame to pull the entire wire through. Or, if you prefer, you can do the swingarm on its own and then proceed to the main frame. Because of the smaller structure, the swingarm was relatively easy. You just drag the magnet along the outside, careful not to scratch the frame's surface and to stay in the middle of the structure so the inner magnet can move more easily. One you get to the main frame, there may be other housings and their zip tie tales to navigate. Because I used an AXS rear derailleur, I only had the housing for the dropper post to avoid. I found that the guide magnet used to pull the wire through the frame could have been stronger and a few times I lost contact with the wire. It was easy enough to find it again and continue the process but a stronger magnet would have been helpful. At this point I still had a smile on my face.
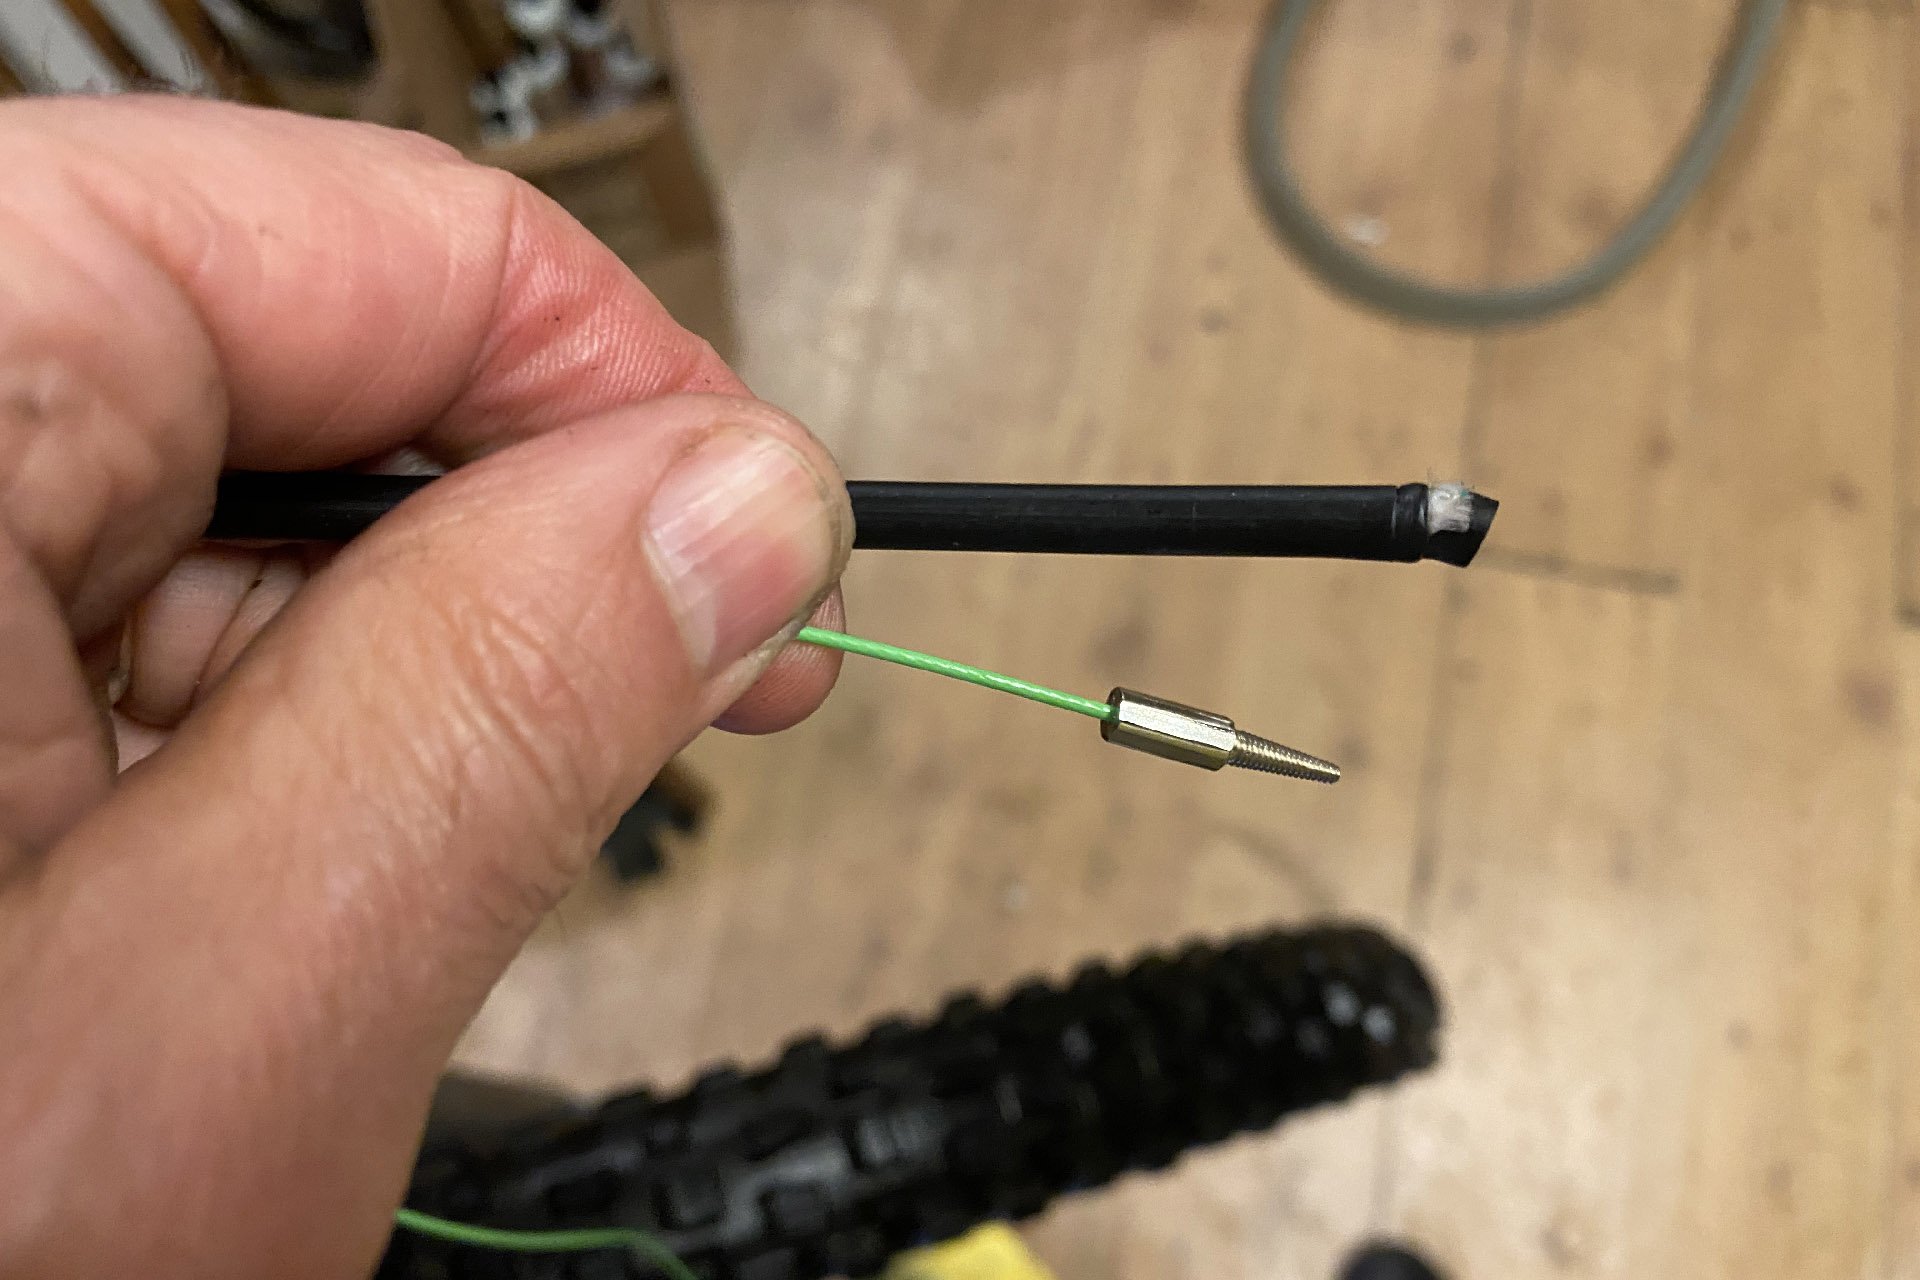
This end bores into either cable housing or brake line. With the latter it's important that you cut off the now-flared end in order to get a good seal for your line at the lever.
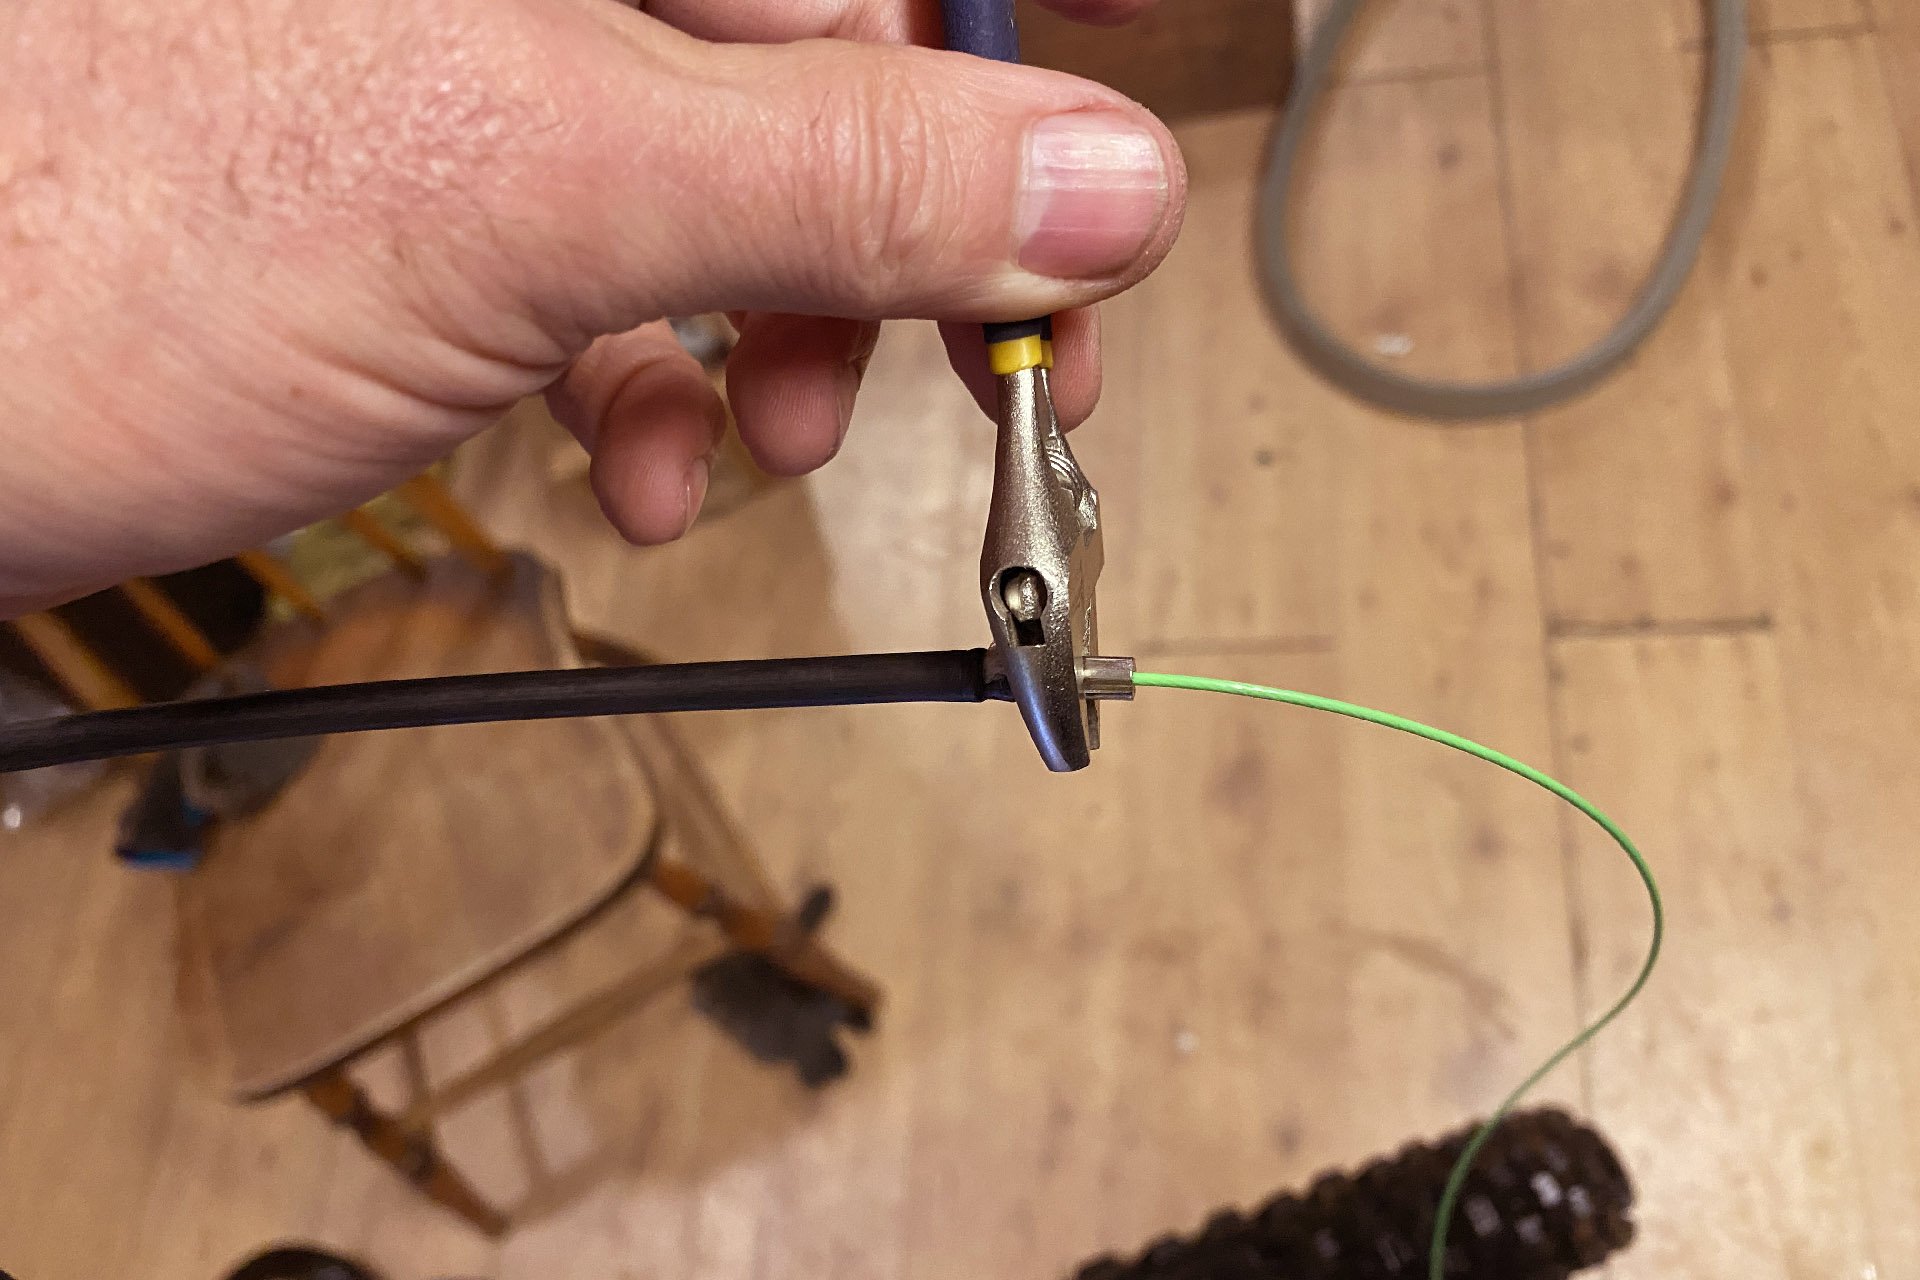
There are flats to help you get a secure connection between the wire and your line. You don't want them to disengage in the bowels of your bicycle frame.
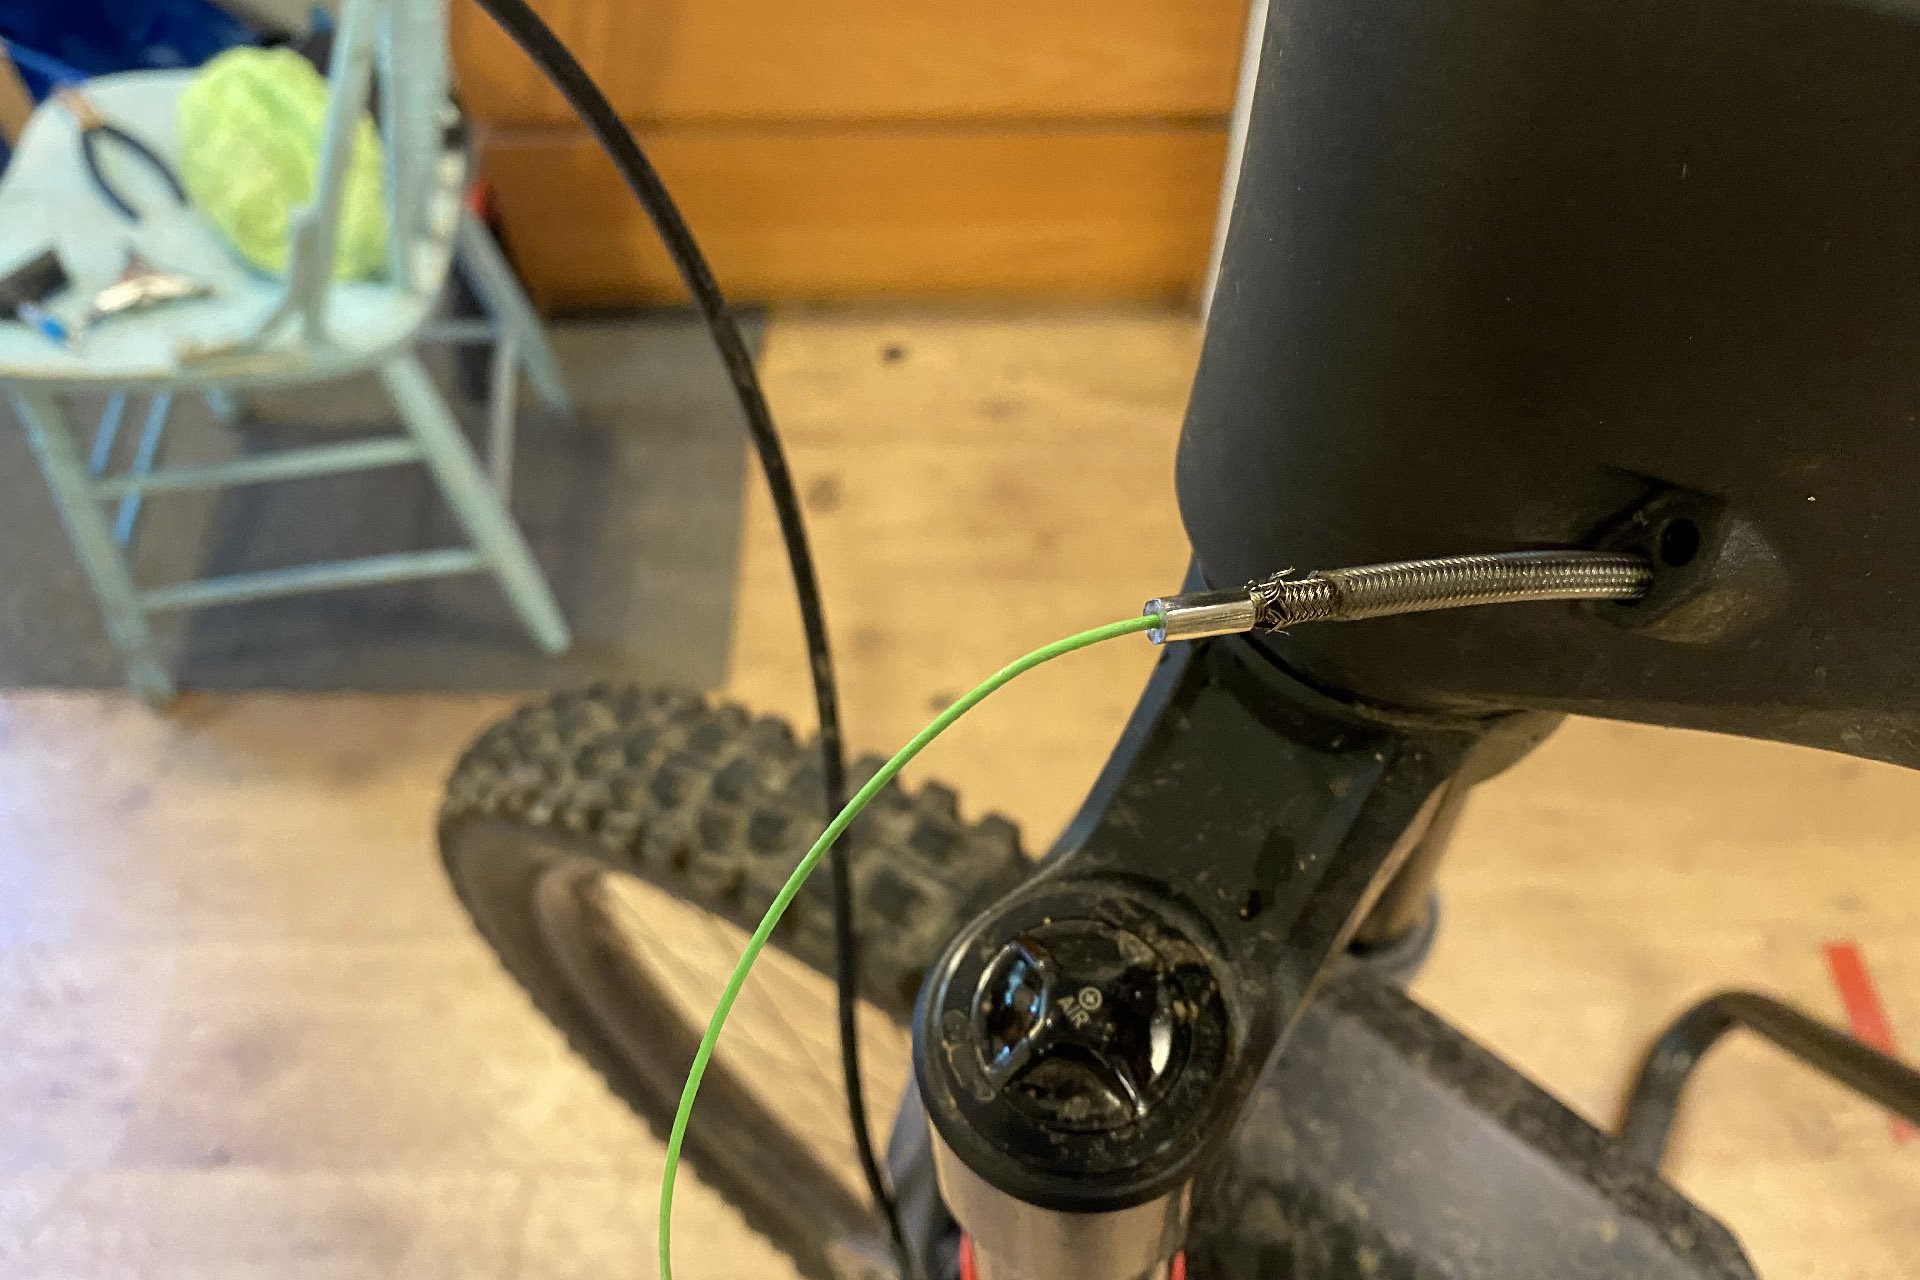
The next step in the post-magnet-system era was easy, or at least it should have been easy, but I was too hasty. More than once. I managed to get the line through the swingarm and then the mainframe only to discover I needed to start again for one reason or another. In the first instance, I attached the brake line only to discovered that the diameter of the braided line is slightly larger than a standard brake line and it was too big for the wee hole. Instead of pulling the green wire all the way out, I decided to pull it out of the front of the swingarm and then pull it back through once I was ready using the other coated green wire. I gently took a round file to the rearmost port and shaved a few micrometers off until the hose would just slide through.

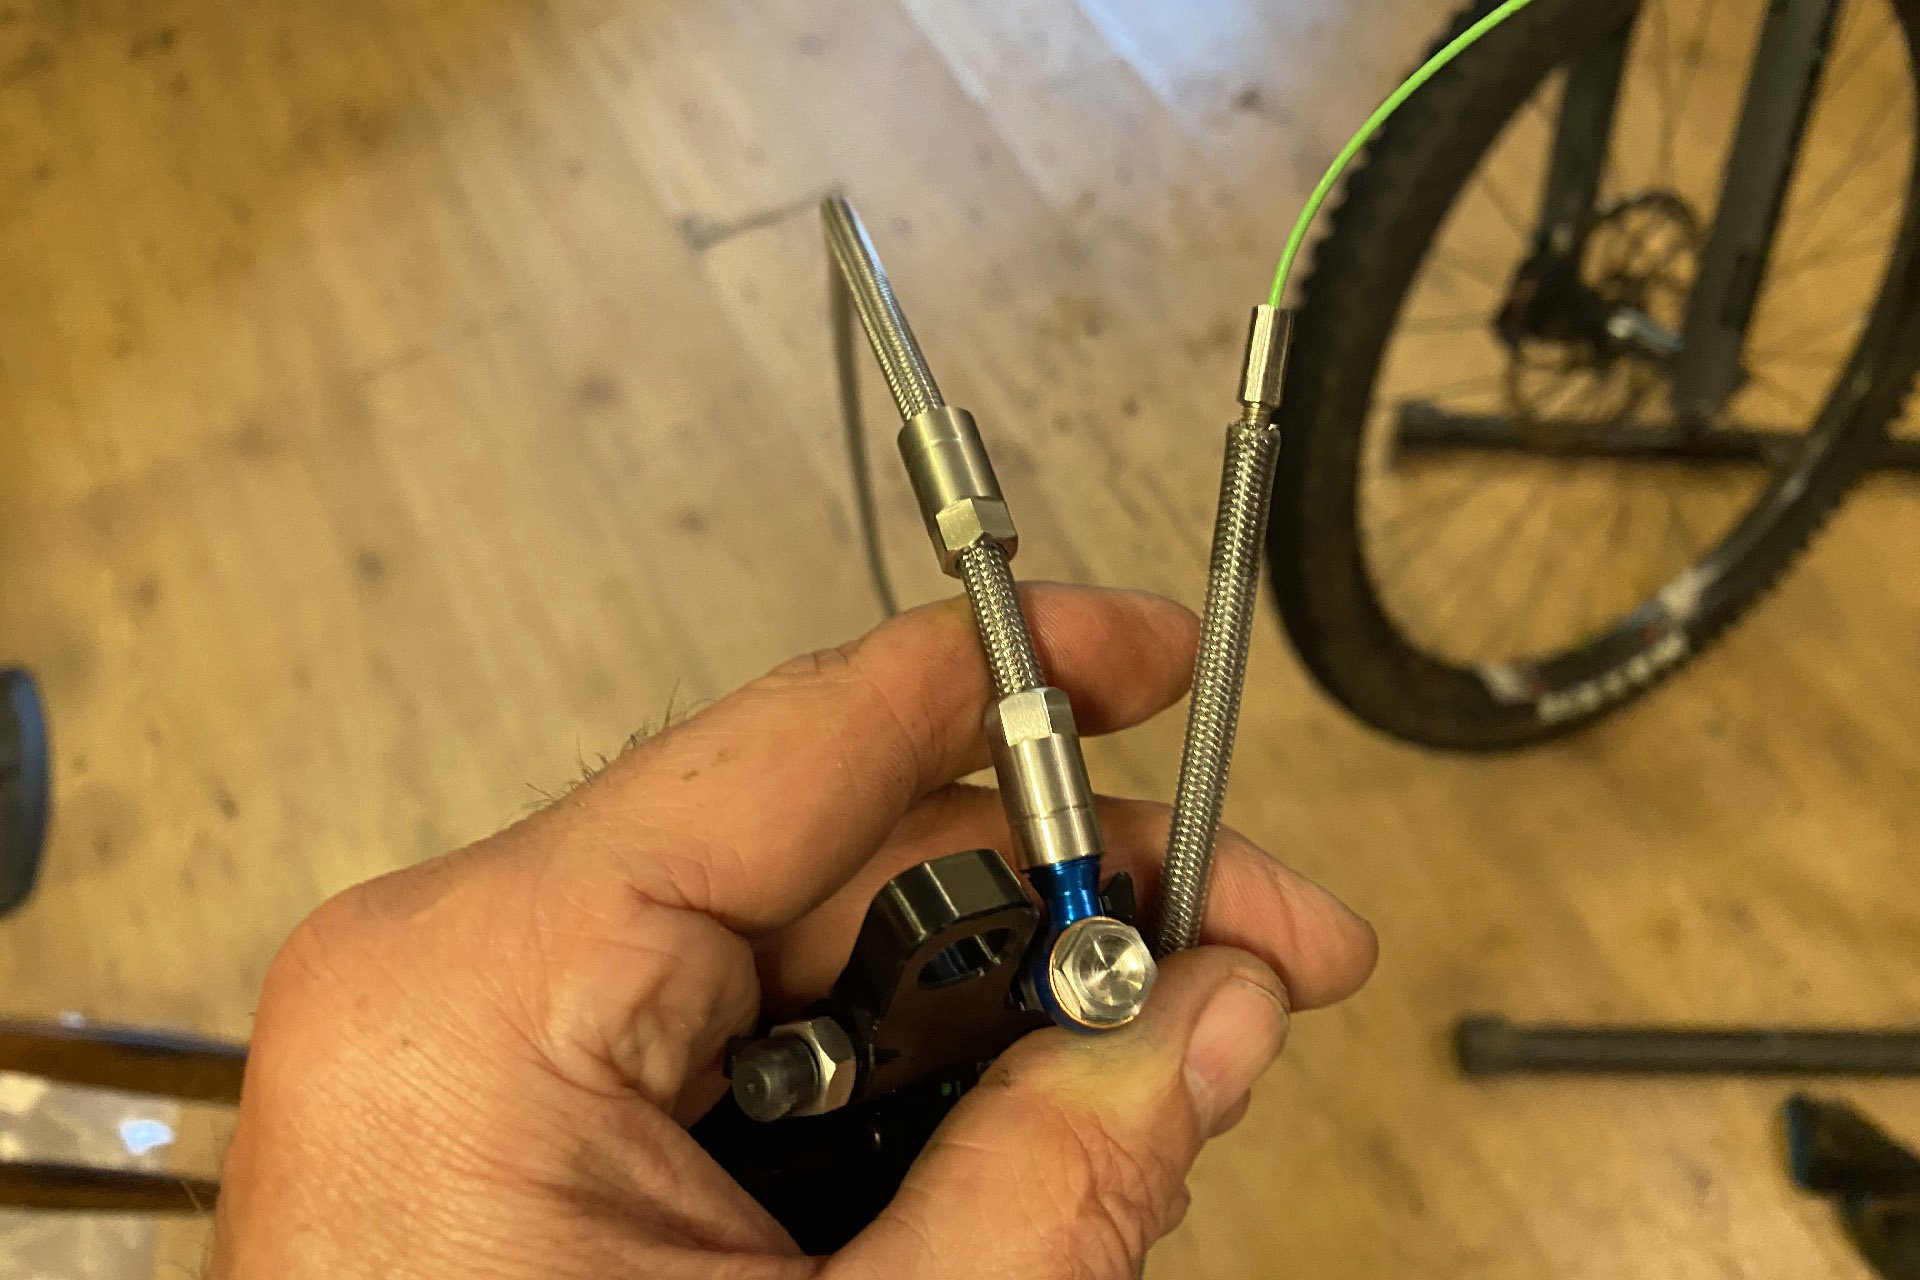
This looks like a crime against carbon fibre, but I was judicious about removing material. The braided lines provided by Hope are slightly larger in diameter than standard lines, necessitating this intervention.
At that point I realized that Wallfire (the sort of fire you'd prefer not to have) had bamboozled me. The kit was supposed to have come with three green-coated wires, as advertised on Jeff's little boutique website, but mine only came with two. There was supposed to be a third line with the opposite polarity of the other two, designed to pull either of the others through, if necessary, without a hint of drama. Instead I received only two, each with the same polarity. Luckily, the end that bores into cable housing or brake line, can be mated with the two-piece end aimed at pulling Shimano Di2 wire (are there other companies making wired components?) through a frame. And actually, the connection was better than a magnetic one would have been.

The tool isn't designed to be used this way, but it's an effective way to pull one of the wires through the frame with the other, which I found useful at a certain point. The magnet doesn't work well on the business ends of the wires.
Finally I was back to the point where I could pull brake line through cavernous carbon fibre voids the way a charmer entices a serpent to dance. I was all set to pull it through when I realized the shroud, which should have been removed long before anything had been strung through the frame, had slid all the way back to the caliper. Once that was removed I was ready. Almost. I then noticed that I had somehow pulled the entire wire out of the head tube so it was no longer in any position to aid my cause. Eventually all that was sorted and it was on to the next challenge.
If the shroud for your lever is at the caliper end once your brake line has been pulled all the way through your frame, you may have a problem.
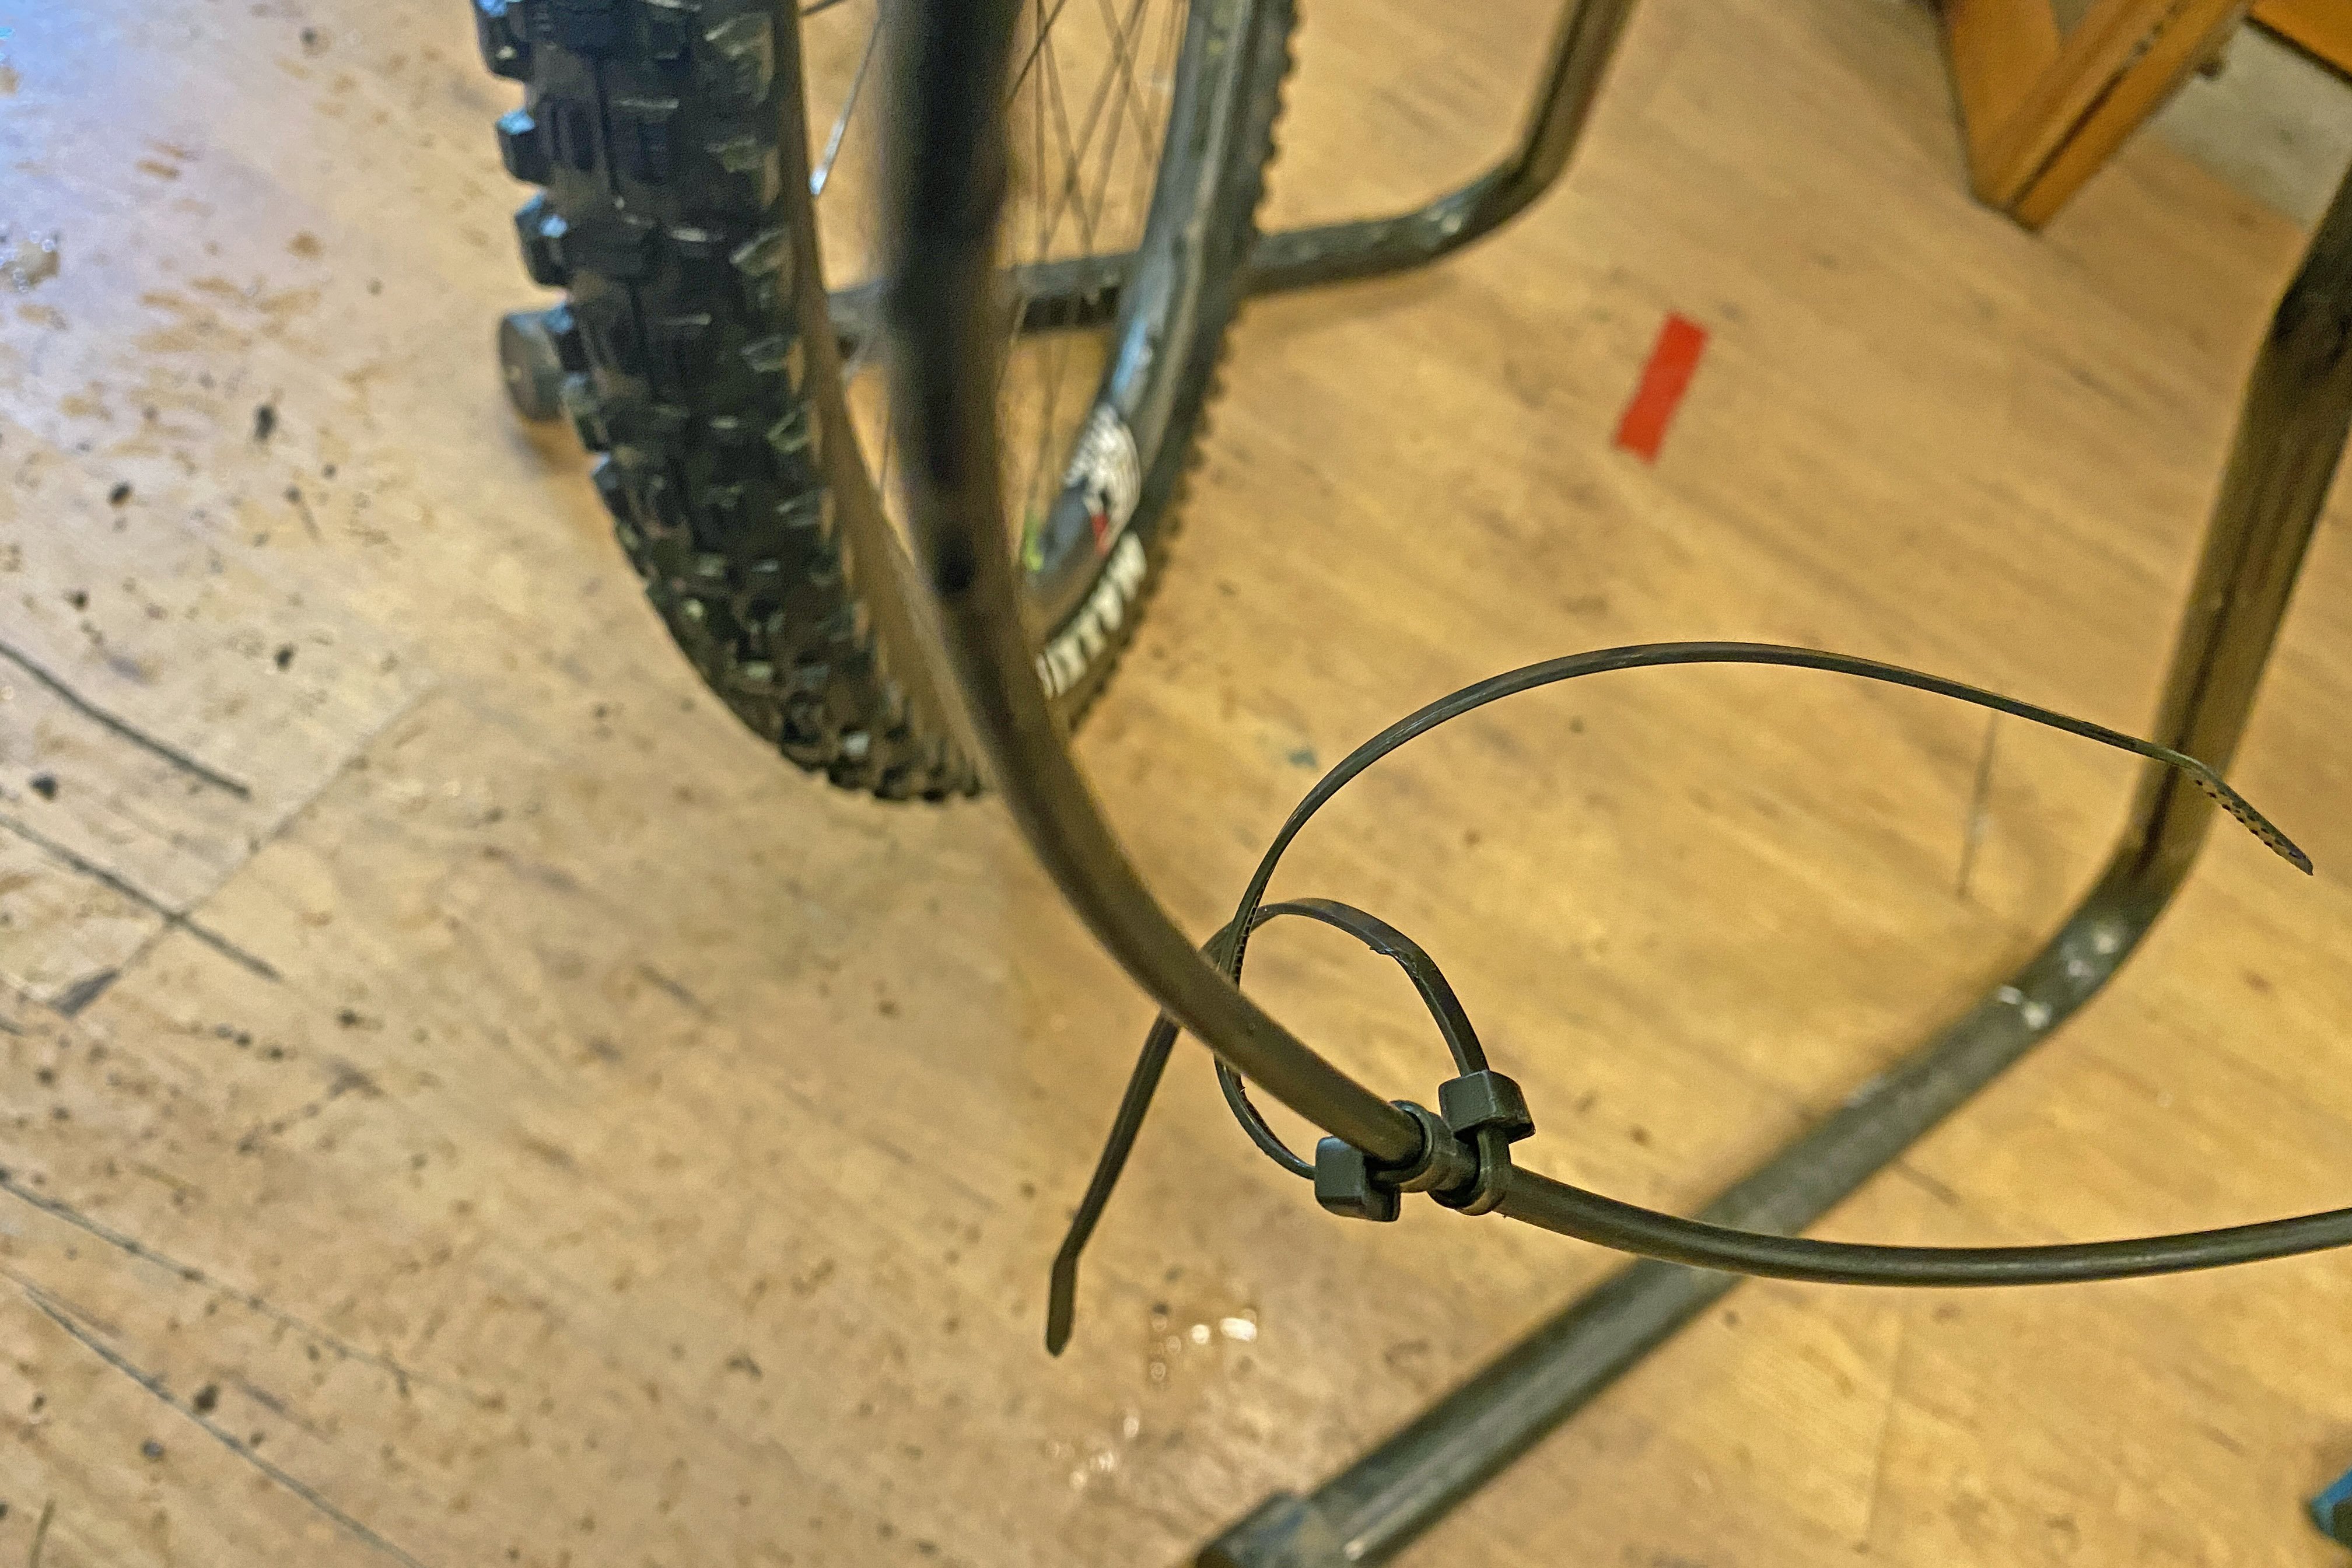
If you are about to pull tubes into a carbon fibre frame without tube-in-tube construction, without any noise mitigating strategies, be prepared for your bike to sound like a tiny baseball bat banging around in a garbage can. It's awful. The only thing worse, and also a great April Fool's prank, is when one of the tokens in your buddy's fork comes loose and slams up and down with every compression. But this is a close, and more difficult to resolve, second. There are several ways to prevent this horrendous outcome but I've discovered on that has thus far been foolproof and relatively simply.
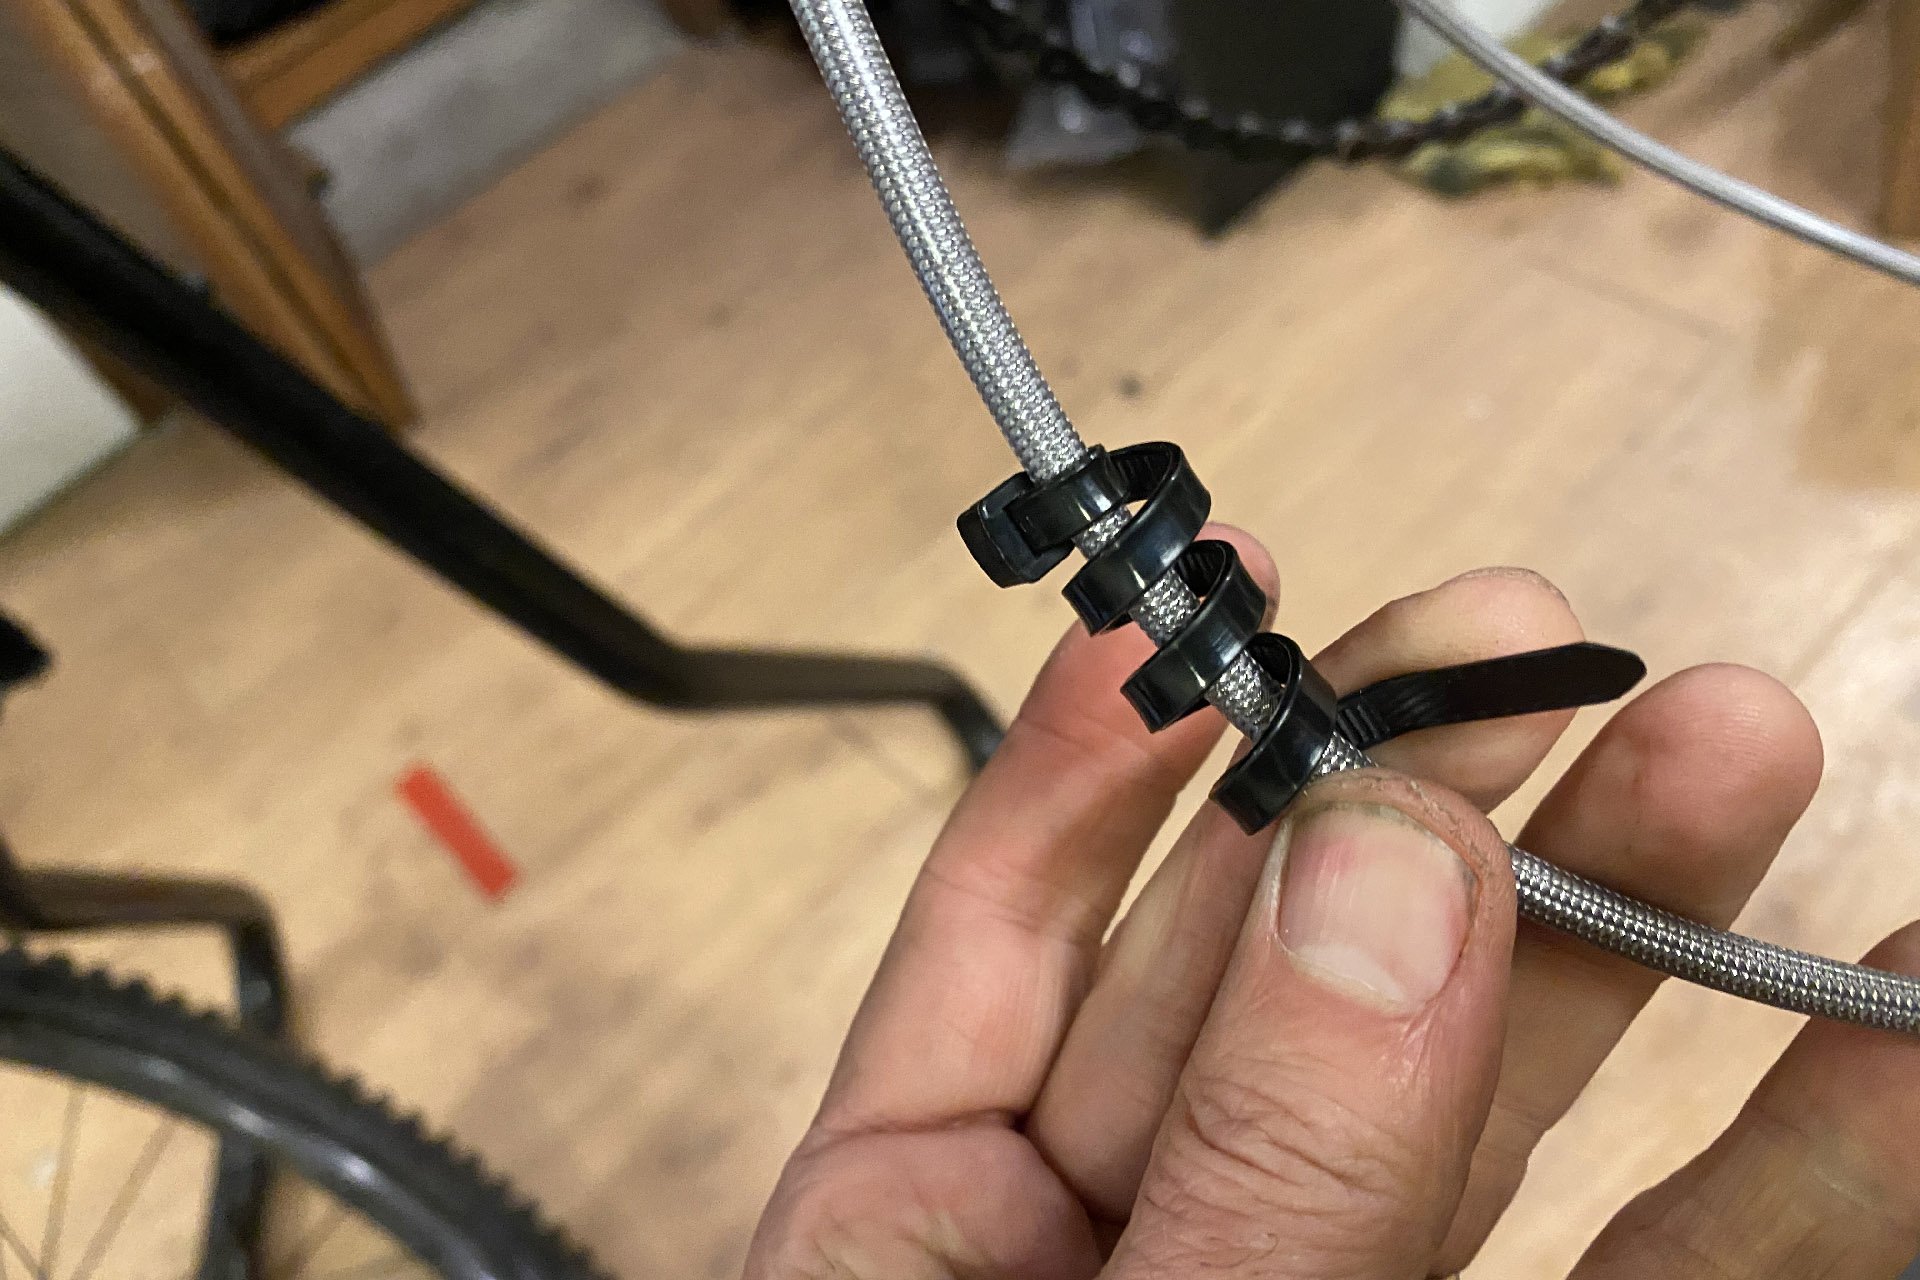
The curled zip tie method for silencing un-captured internal lines is crude but it has never failed me, going back to my 2015 Giant Reign, which made a terrible racket at first.
The idea is to secure zip ties around the housing or hose in question, with their tails intact, and then wrap it around the particular tubular structure as tightly as possible for insertion. At this point you should have a coil, as cute as a piglet's tail, curling around the long, thin, conveyor of wire or fluid. You may have already surmised that this plan is dependent upon the presence of a port at the bottom bracket, or at worst, the absence of a steerer tube. This is the sort of process best not left to chance. I firmly secured two zip ties around the brake line, (the last few remaining from the pack of 1000 I purchased in the late 90s,) after it had emerged from the swingarm. I was far too proud of myself for remembering to do this, which undoubtedly impaired my ability to estimate where the frontmost zip tie should be attached. I managed to navigate the end of the brake line through the port on the head tube, only to discover that the first zip tie was too close to the end of the line, preventing it from pulling through all the the way to the brake lever. In fact it wasn't moving. At all.
When I removed the Code RSC rear line from the Arrival frame the zip ties I had spaced out along the line had migrated together. They still did their job and the line was silent within the frame but this time around I tightened the ties more securely, hoping they would keep their distance from each other and balance their suspending properties the entire length of the down tube
This can be a triumphant moment, until you realize that you tightened your leading zip tie too close to the leading end of the brake line and you have to pull the whole thing halfway out and start again.
The positive about an embarrassing error made while maintaining your bike, particularly when you announce it publicly, is that you are less likely to reproduce the same error in the future. And I am getting to the point in my recently elevated DIY career* where I feel like it's time my batting average gets into the .350 range but I'm not there yet.
I pulled out the hose once again, and manhandled the too-tight zip tie into place, approximately 1/3 the way down the down brake line, to balance the other tie.
*It's not just bikes - I've been inexpertly fixing dishwashers, driers, our fridge, my new-to-me 16-year old car, a broken HDMI cable, doing a little plumbing etc. I've avoided tackling most of these sorts of tasks until this point in my life but I'm enjoying leaning into them now.
Sliding these grommets along the line to get them placed correctly is kind of annoying because the rubber sticks to the line quite effectively. If you curl them up into a donut and then roll them along the line until you get them where you need them it's much easier.
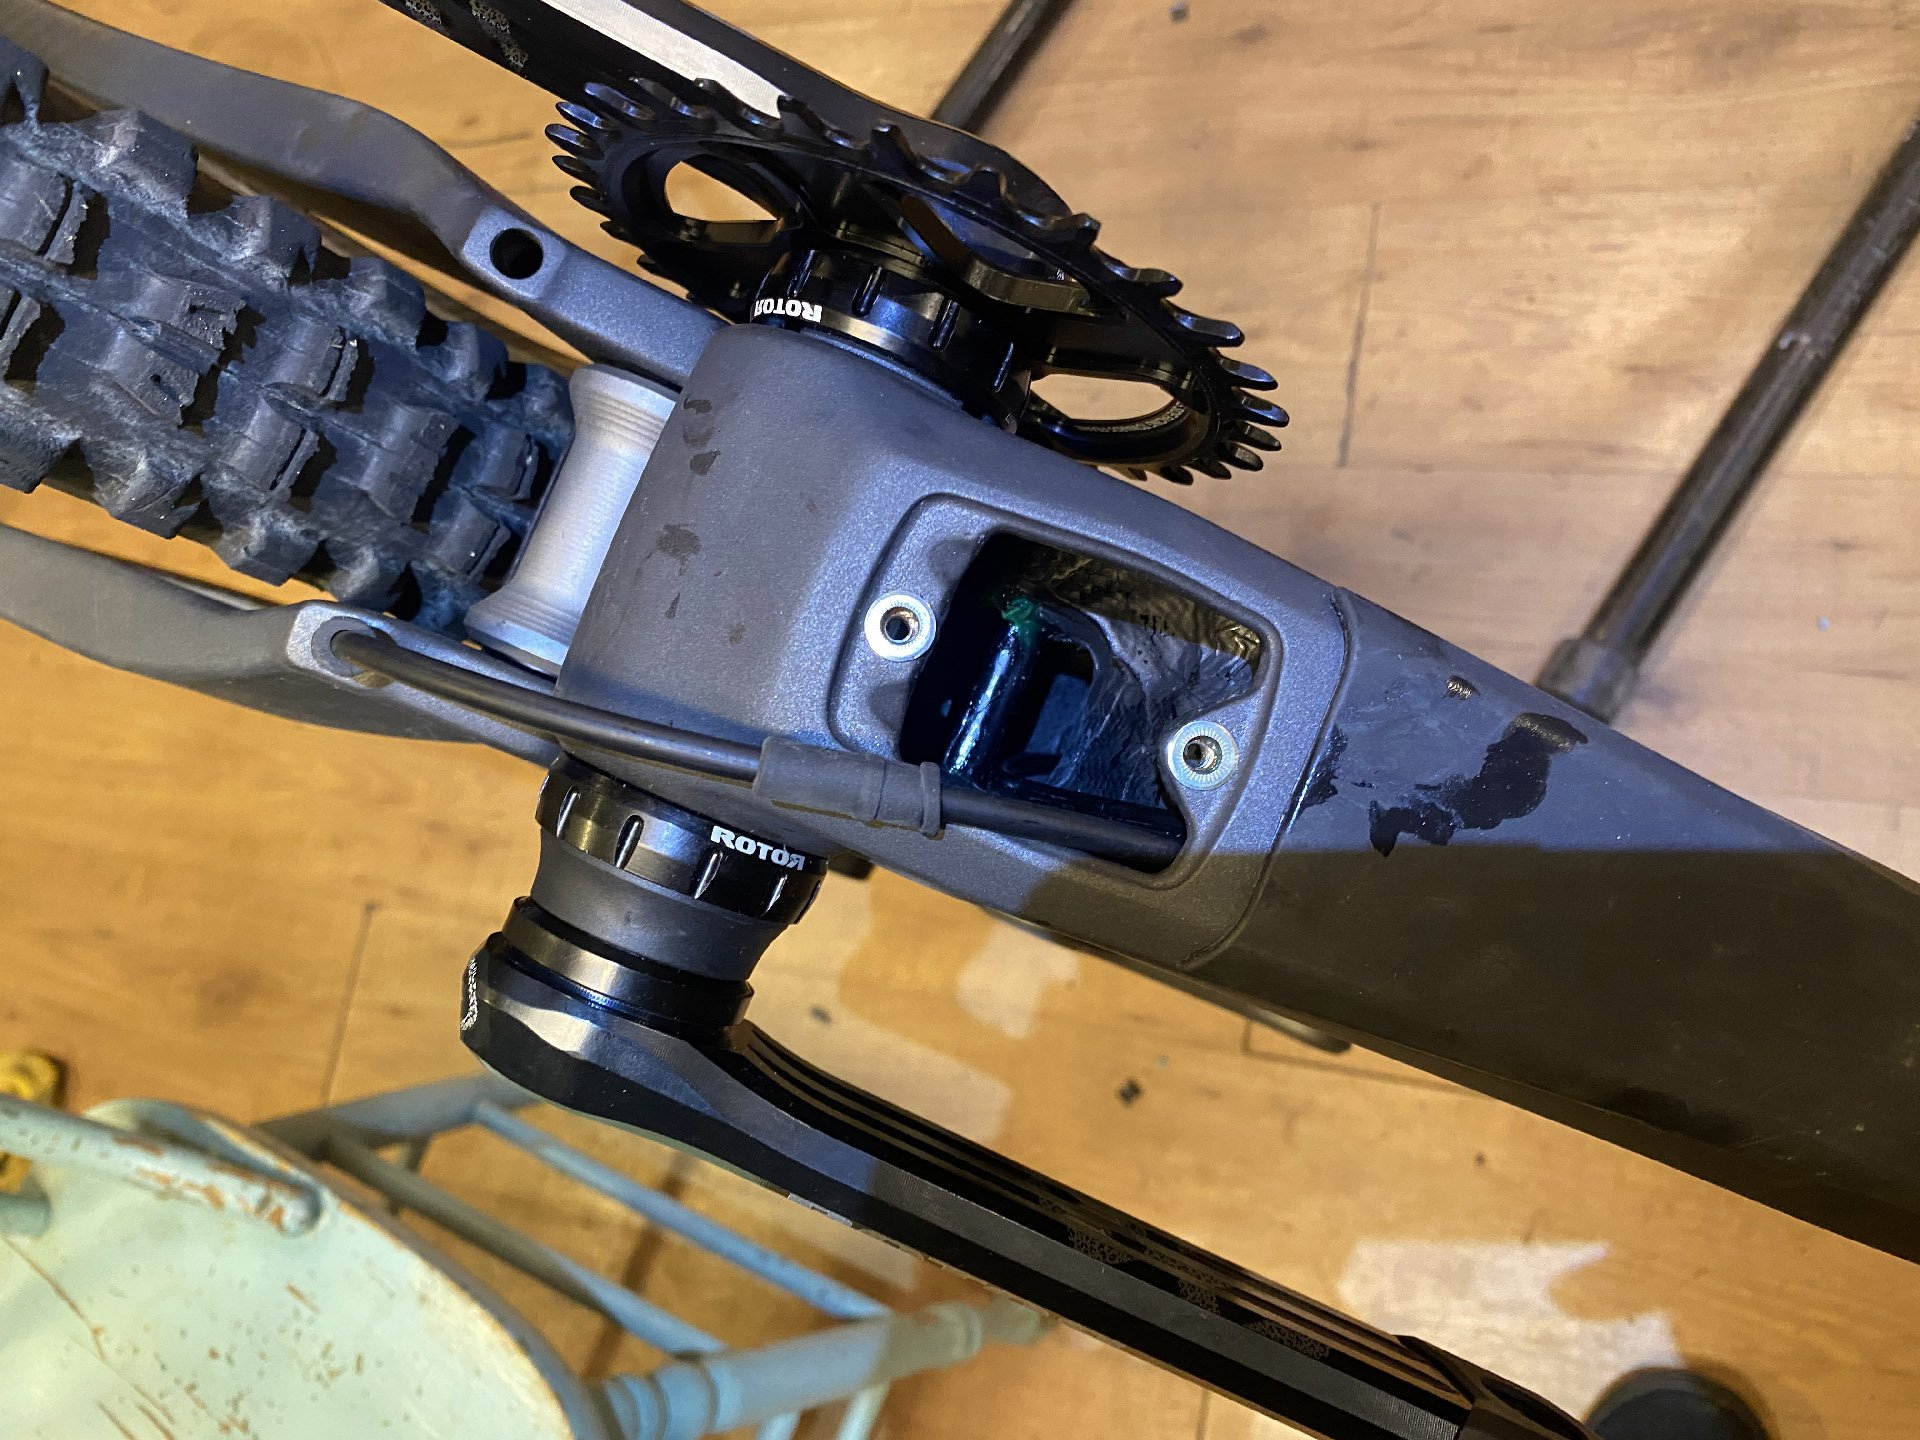
Pieceofmotherfuckingcake, I said to myself, far too soon. It was time to focus my gaze on the finish line and then I realized I had forgotten to install the two rubber grommets, provided by We Are One to help create a seal at the front port of the swingarm and the removable rear port of the main frame, right around the bottom bracket. I cut the zip ties off and rolled these into place, which is another somewhat frustrating task. At first I was trying to pull the inch-long grommets along the line but they are quite sticky. Rolling them like donuts is much faster. Finally I placed two new zip ties securely and more accurately onto the line, once again screwed the threaded cone end of Akantor AK 320 installation wire into the end of the line, and pulled it into the hatch at the bottom bracket.
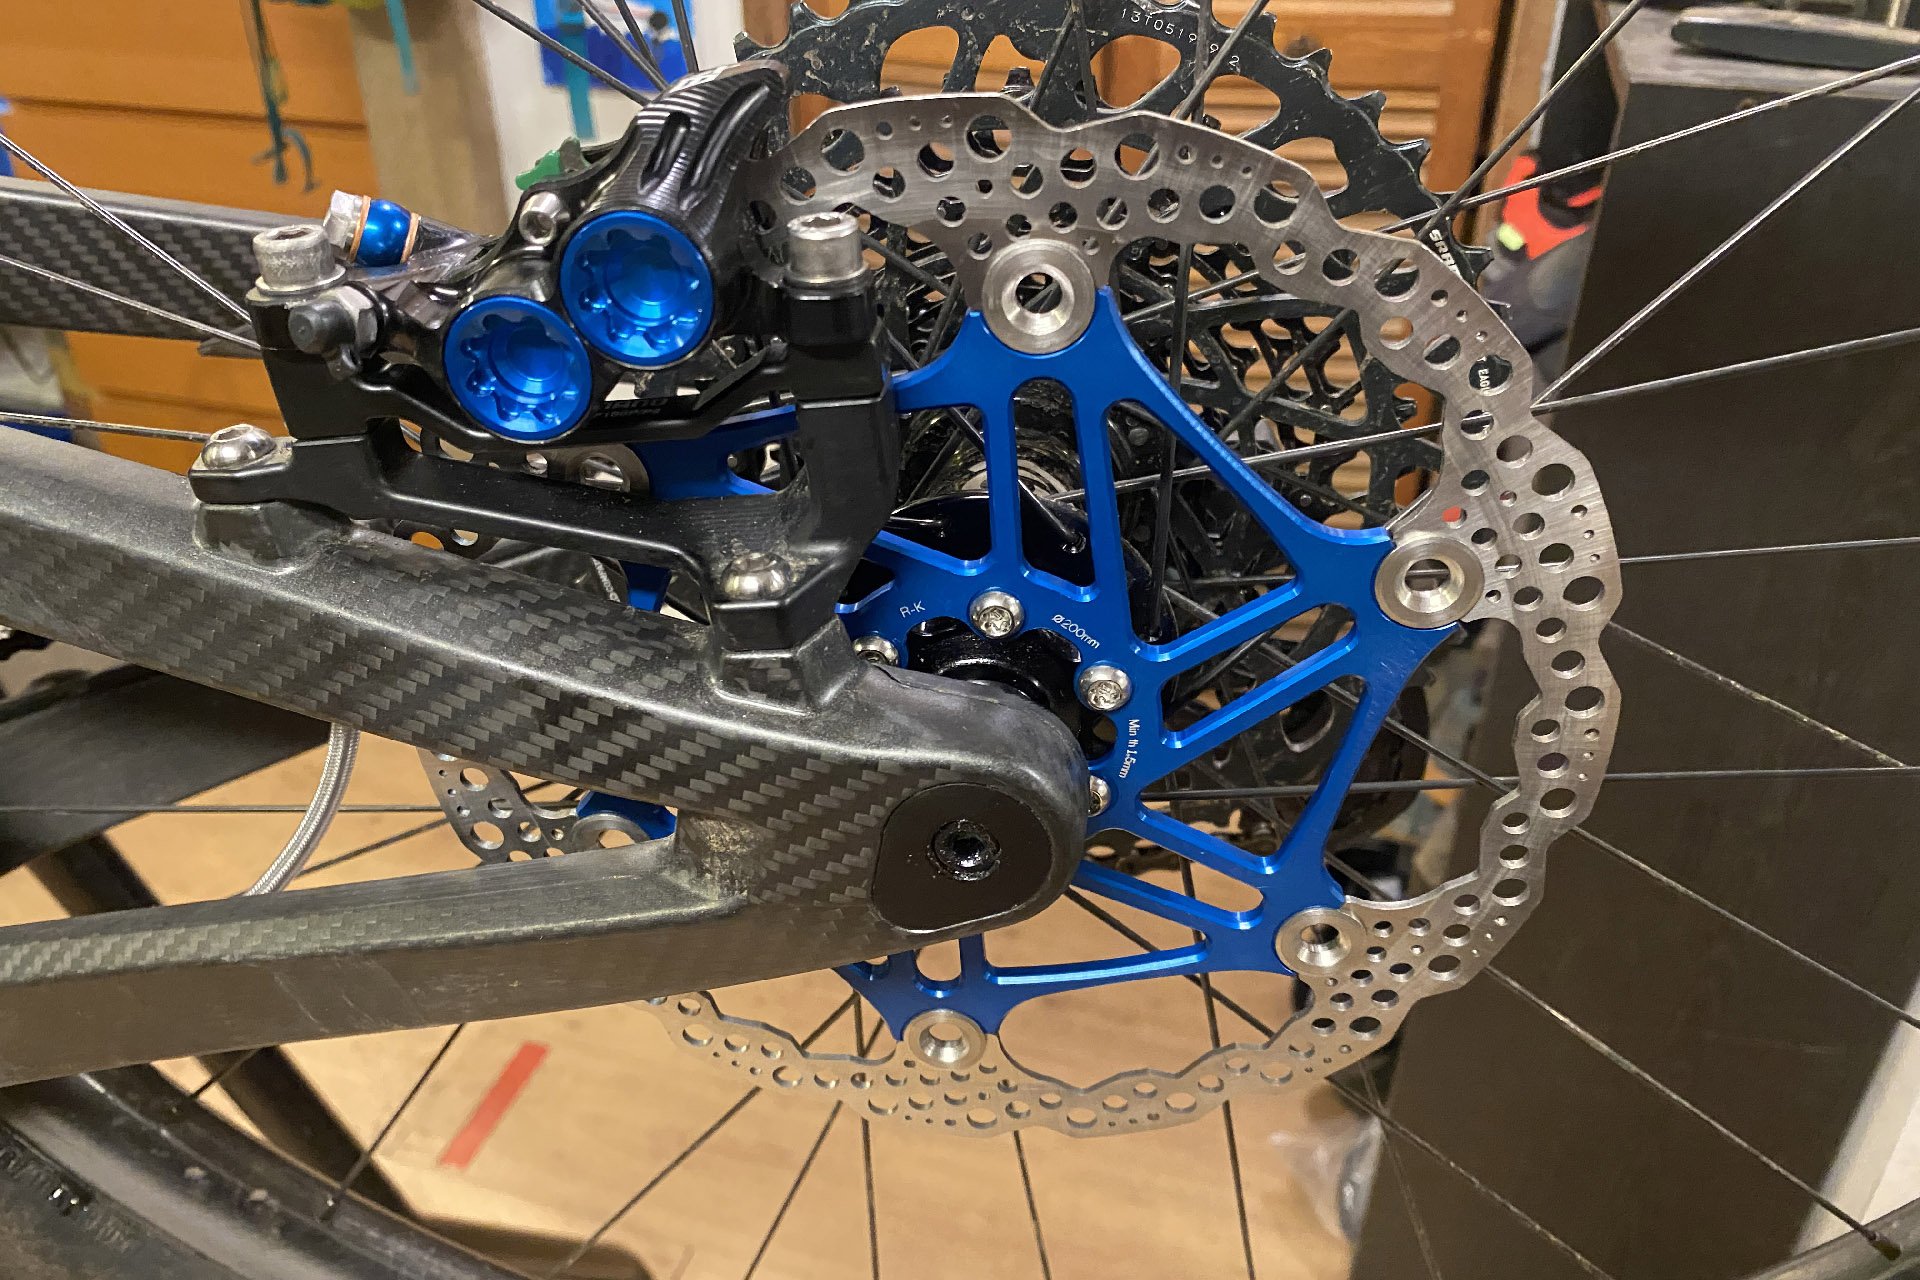
This is my first time on Hope brakes and the install process gave me lots of time to marvel at the craftsmanship and attention to detail. These look fucking amazing, but I can't yet tell you how well they work yet. This is the Hope Tech 4 E4, designed for enduroing over hill and dale, and they are entirely made in Lancashire England.
There are no rubber covers to sanitize the look; the machined parts are all proudly displayed. I'm a fan.
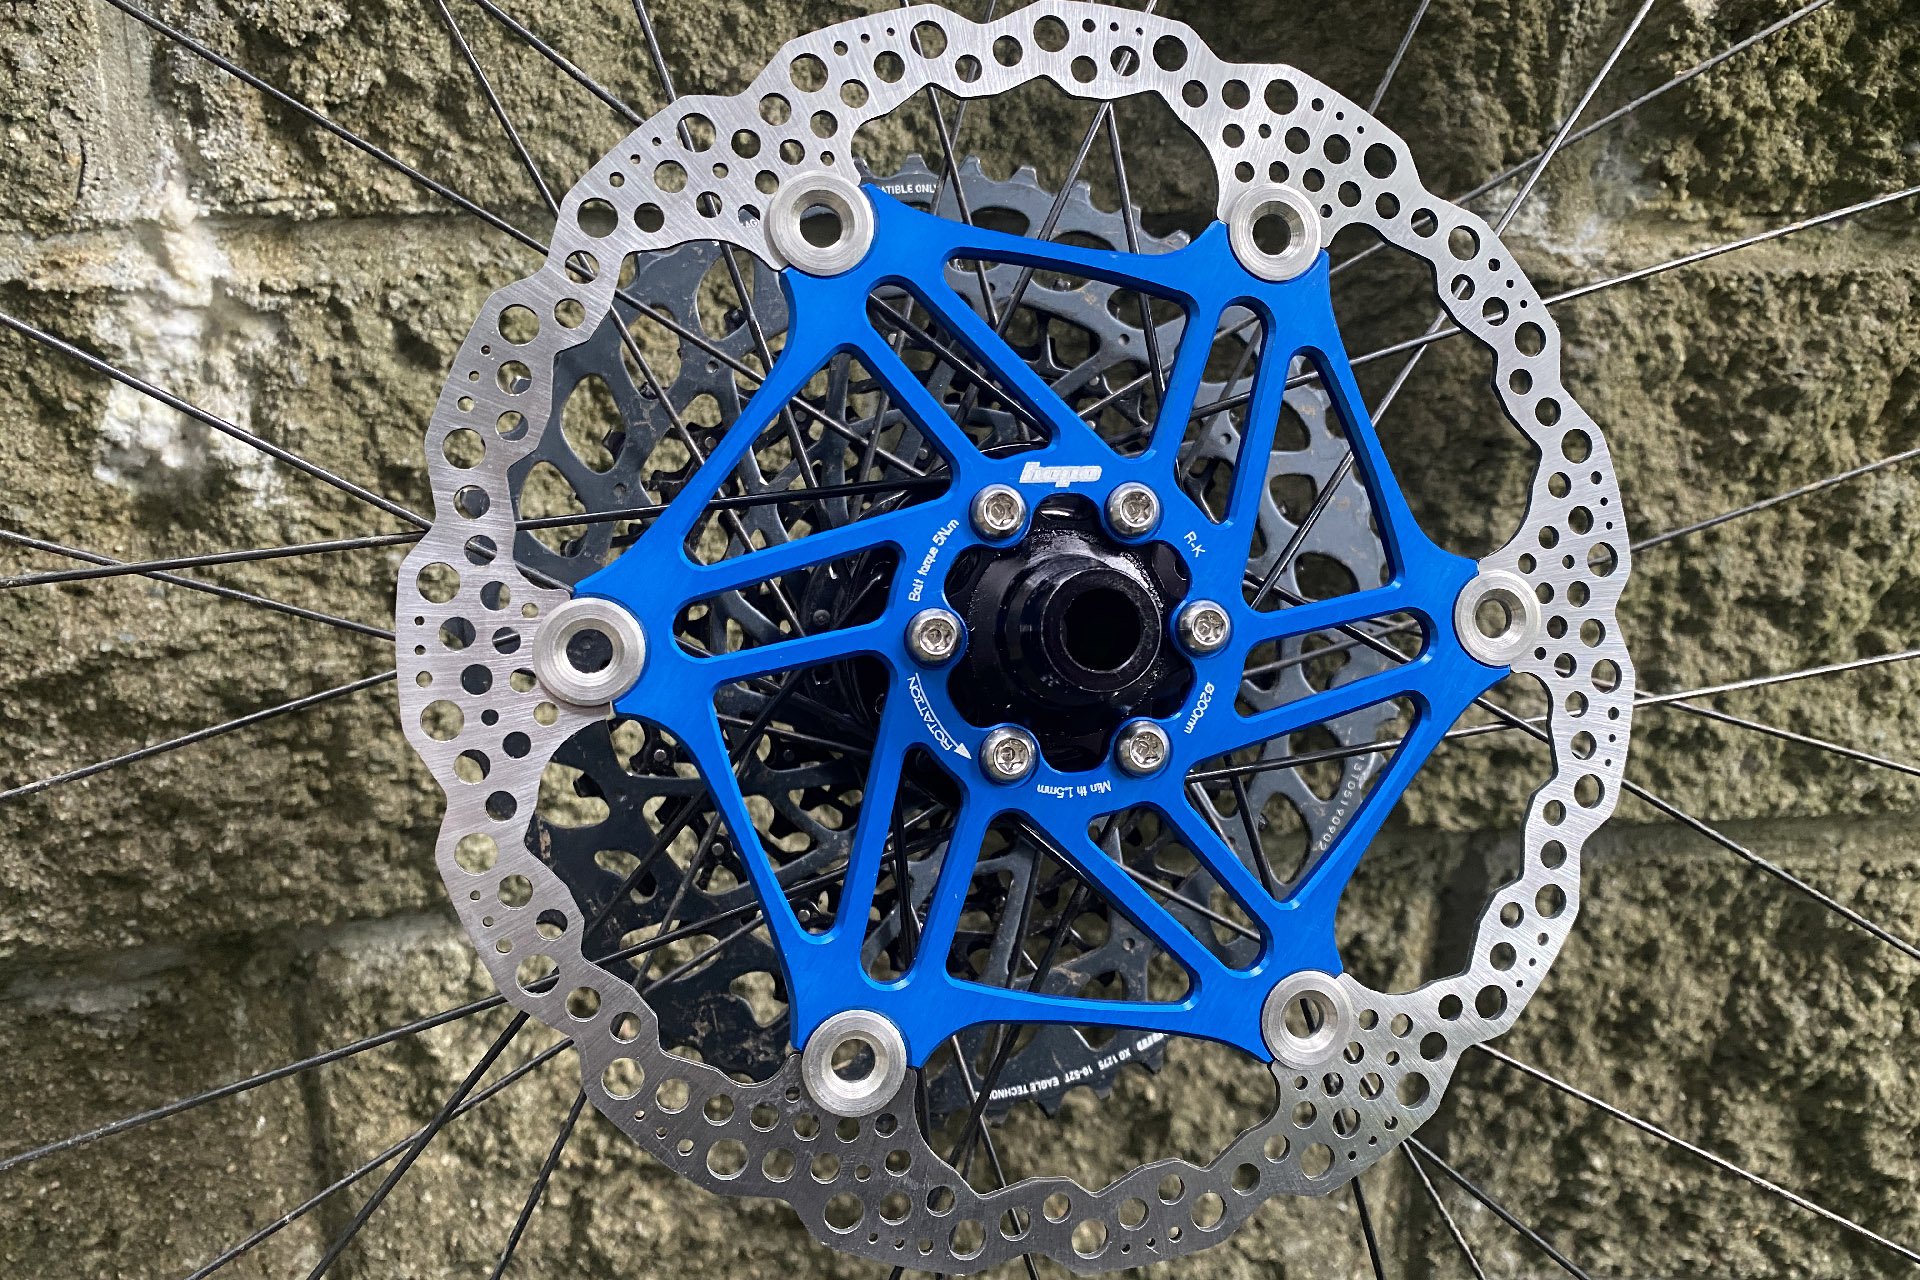
I have yet to behold a more beautiful rotor.
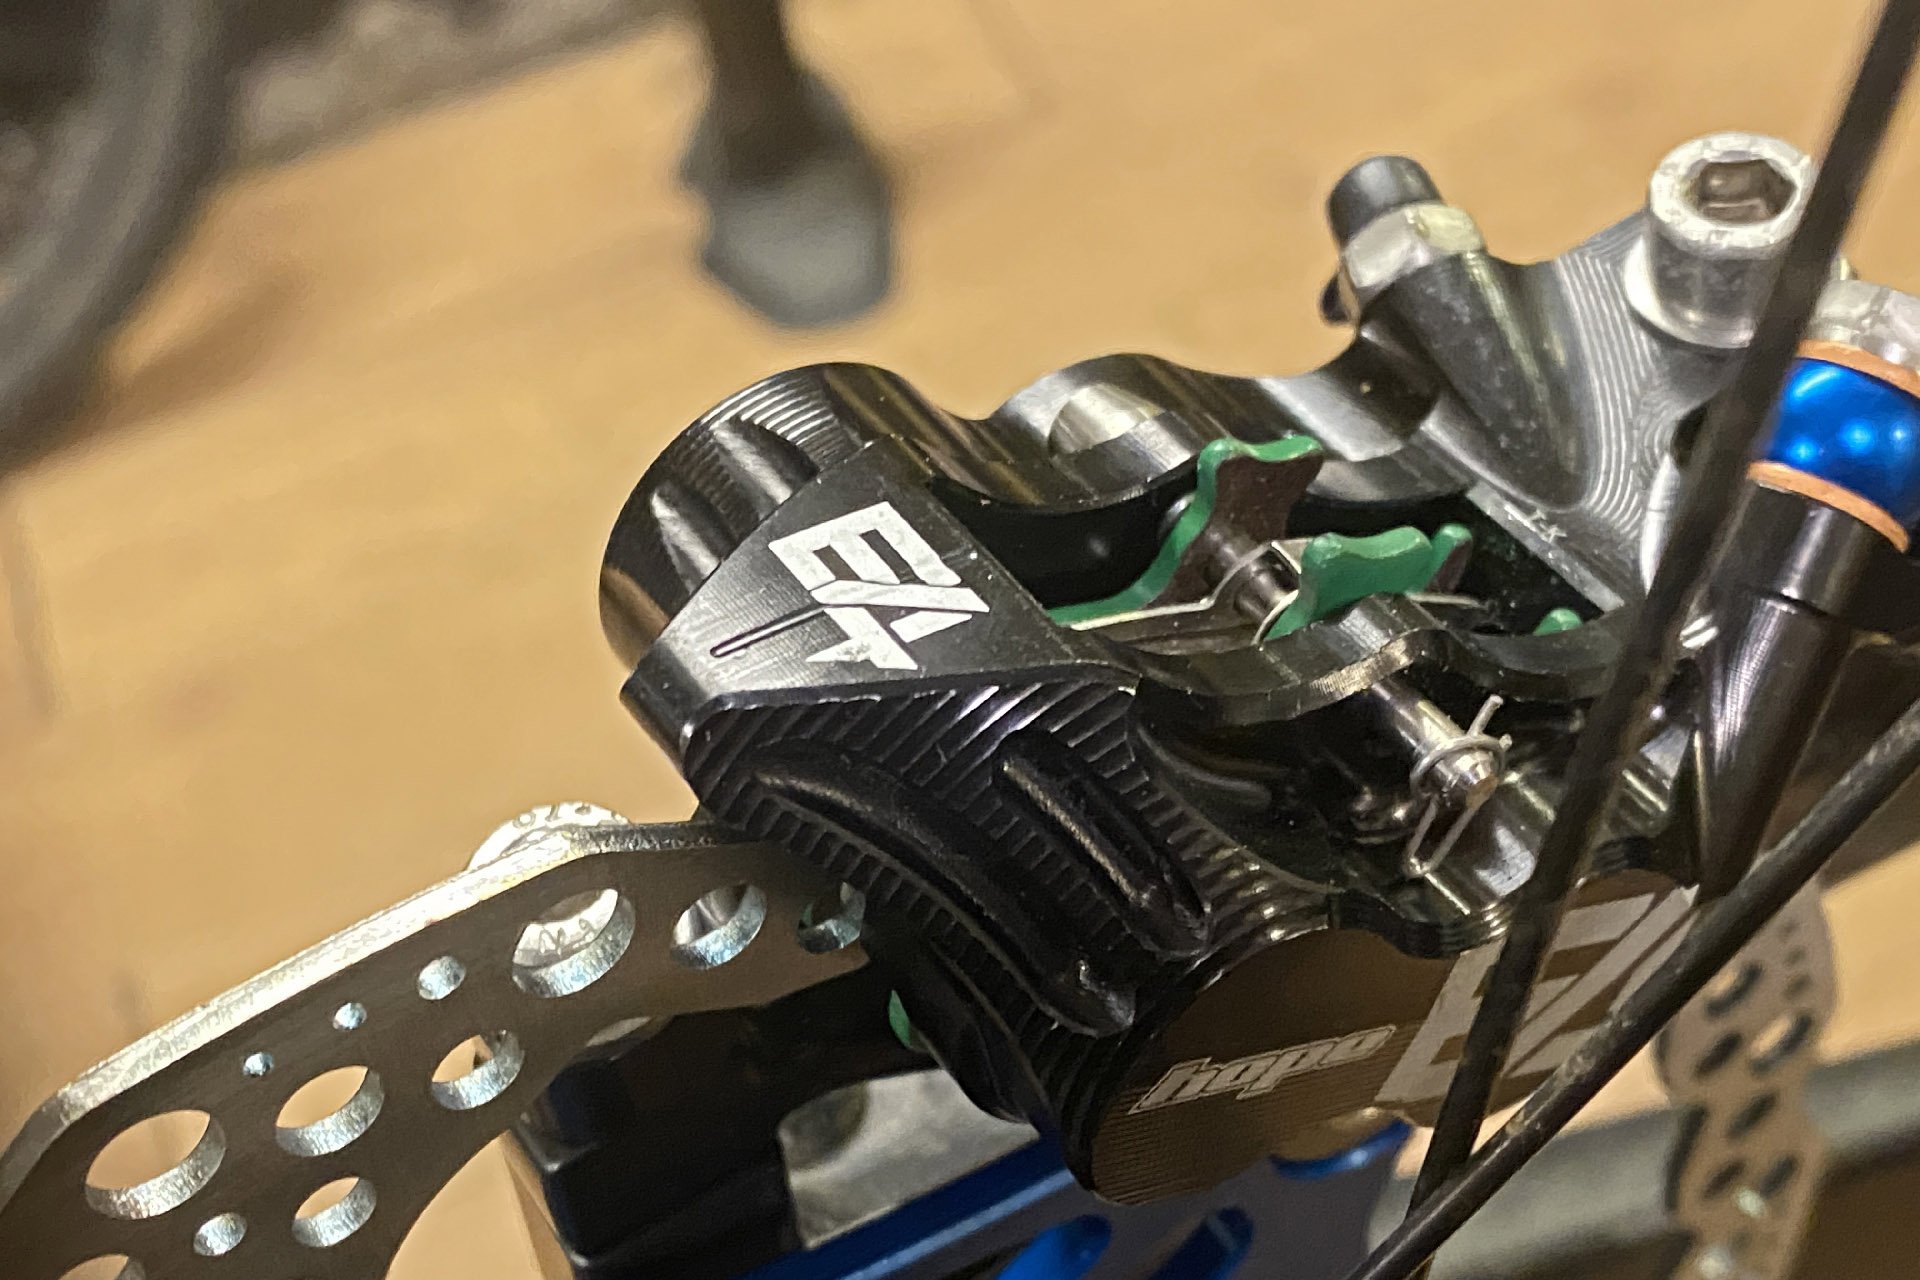
I love being able to see the machining on the caliper. On top of looking cool, I assume this rifling* increases the surface area of the caliper and accelerates cooling.
*one of you machinists can tell me what these are actually called

Yes, I have been riding the We Are One Arrival frame with the 170 mm links but We Are One has asked me not to tell you about it just yet. They have been moving their shop (again) and will not have the links until at least the fall, so PLEASE don't bombard them with inquiries about these. Every phone call or email will delay the process by at least 17 hours so your patience will be rewarded by allowing them to build stuff.

The goldielinks. These are pre-production and the order was marked "to be returned" so you can expect the finished product to look different. If I was asked if I like the 170mm version of the Arrival I would say yes. But that's all I'm going to say until I get the go ahead from Dustin and the crew. Until then I'll be continuing my research.
The last step was to repeat the process of getting the braided line out of the frame on the non-drive side of the head tube (for those of us who place our rear brake lever on the drive side of the frame). This is a little finicky and I was a little worried about pulling everything through the second time with the long zip tie tails on the brake line but I eventually was successful and all that was left was to cut the line to length and bleed the system. I have a couple of different tools for cutting brake line, both with a guillotine-action, but they were useless against the metal mesh of the braided line. I used a pair of housing cutters, which was a bit like a hot knife through chainmail be eventually successful, and then I grabbed a sharpened spoke to open the internal hose of the line that had become crimped in the process.
And Bob is your mother's brother!
Give it a try. If I can do it, you surely can. Or if you are an expert in this area and have some tips, please share them with us.


Comments
Maximum Radness
1 year, 6 months ago
When I needed a second job, I interviewed at a local bike shop.
I walked in and claimed every internal routing project they had and the previously hired techs loved it.
And I got to zen out with all kinds of terribly thought out bikes, droppers, brakes.
Embrace the pain.
Become the hole.
Fill the hole.
With cables. And hoses. And foam.
Reply
danithemechanic
1 year, 6 months ago
This is a thing i would love, having specialized mechanics for this or that job, doing the best one kind of they can. I always wondered why we all have to do everything while in the automotive industry the technicians are much more vary.
Reply
HollyBoni
1 year, 6 months ago
I think because bikes are a bit more simple. And with that i'm not talking down on mechanics, I worked as one too. There is complicated stuff for sure and you have to be familiar with a lot of different things, but overall i'd say it's not that bad. One area where I see specialization most often is suspension.
In the automotive world you might have someone that specializes in electronics, or someone that does fabrication, or someone who builds engines, someone who does alignments etc. All those require a different skill set, and different equipment (that's super expensive most of the time).
Reply
danithemechanic
1 year, 6 months ago
I think this generalization has ended about 10 years ago. Everything has hydraulics, electronics, different materials and more generally, at least requires a torque wrench even just to be sure not to fuck it up.
Sure it will never be as complicated as a car because there's thousands less parts involved, but it'll still be nice to have a wheel tech, a suspension tech, a brakes tech, an electronic tech, ...
Instead of a single person that has to know all of this, plus the other 50 years prior of outdated technology, and still be up to date with the latest.
I'm happy to learn all i can of everything in my job either past, present and future; it's an impressive feat but really exciting.
I just think that the prices and technology of the latest machines could justify an update in the way we work too.
Reply
schwaaa31
1 year, 6 months ago
Well, F internal routing for brake lines. Horrible idea that's sticking around way too long. Kudos to the companies that are bucking the trend.
Reply
Pnwpedal
1 year, 6 months ago
The funny thing is that commercial construction has been dealing with pulling thousands of feet of wire at a time through conduit for over a century. Suck a pull string or push a fish tape through one way, attach the wire/cable, pull it through the other way. A shop vac and some masonry string makes this super easy.
Reply
cheapondirt
1 year, 6 months ago
Why have I never heard of using a shop vac?!
Reply
cheapondirt
1 year, 6 months ago
More than once I've contemplated buying stick-on hose guides but my pride won't let me.
Reply
Vik Banerjee
1 year, 6 months ago
I did that on a fancy carbon wunder bike with foolish internal routing. You know what after 10 mins I stopped noticing the cables/guides and when I had to do maintenance I was a lot happier.
Reply
chacou
1 year, 6 months ago
Makes me appreciate GG’s “cable panel”
Reply
Cam McRae
1 year, 6 months ago
Indeed. They are onto some good stuff it seems, although I haven't yet experienced one myself. Might be time for a test.
Reply
Brigham_Rupp
1 year, 6 months ago
There may have never been a better case made for external routing than this lengthy article!
Reply
Agleck7
1 year, 6 months ago
Thank you, Transition.
Reply
Johannes Schmidt
1 year, 6 months ago
Not anymore with their latest (e) bike
Reply
Gage Wright
1 year, 6 months ago
For any serious FAFF I take off the fork, the cranks and will even disassemble the rear pivots if need be to guide my cable home. Head lamp or flashlight in mouth, picks and spokes, along with a connectormagigy from sram and you are in business.
I have now recognized that the problem is space. I spend less time taking off a few key parts then reassembling than if I were to try to perform this procedure on a fully built up bike. There is simply not enough of it with an assembled bike for my fat fingers to prod and poke around.
Make an incision, retract and then dig.
P.S.
The bonus to this method is that you get to clean and regrease the little forgotten nooks and crannies of your beloved steed.
P.P.S.
The routing of cable under the BB seriously discounts the risk of baby heads kicking up, slipping on a skinny just to come to rest precariously on your BB or a grind and push through pointy rock rolls. WR1 you are killing me with this. Everyone look at the bottom of your bikes. How many dings and scratches are there? How about this logic. If this is not a high damage area then why do many bike companies put rubber around it and on the down tube?
Reply
Sandy James Oates
1 year, 6 months ago
Those braided lines for hope brakes are so much fun to install.
Reply
Mammal
1 year, 6 months ago
I have to go through this process when changing shifter housing, but also when I installed the new brakes I bought. The ports on my Ripmo AF are quite small, have no guide tubes, and the shifter housing re-enters the chainstay for extra fun, so it's a good example of a challenge.
Tip 1 - make a small hook on the the end of a spare spoke, so you can fish the cable out of the exit port. I need a flashlight to see when it's passed by the port.
Tip 2 - When the housing/lines are run through, to make sure they're quiet in the downtube, shove the all possible loose housing/lines into the tube, so they are tight against the inside surface of the tube (no movement). I wrap the housing in electrical tape at the appropriate locations by the ports so when I screw the ports back in, the tape acts as "blocks" keeping the housing shoved in. Mark the housing where the "blocks" need to be wrapped.
Tip 3 - [Related to tip 2] Size the housing/lines from the back to the front. Account for appropriate derailleur cable loop or rear brake routing, then work your way forward. Find the good spot for your lower downtube "block", mark it and hold it there, then shove housing/lines into the downtube from the top end, and find the good spot for your upper downtube "block" (mark it). When the blocks have been made, housing/line has been shoved, and the ports have been put back in place, size the appropriate loop to your shifter/brake lever.
Mega faff, for sure, but once the process is worked out, I don't think special tools would help much.
Reply
Lu Kz
1 year, 6 months ago
Adding a headlamp to my toolkit for dealing with internal routing woes was a gamechanger. Having both hands free AND having the holes lit is fantastic, won't go back.
Reply
Cam McRae
1 year, 6 months ago
I've been doing that as well. Very useful.
Reply
colemaneddie
1 year, 6 months ago
As someone with ADHD who has done brake swaps on 3 internally routed non tube-in-tube bikes in the last year, I resonated almost too much with this post. Down with internally routed rear brake lines! Or up with AXS Code RSCs!
Reply
finbarr
1 year, 6 months ago
Such a great article. Thanks for this- I love reading mechanic war stories.
Reply
Cam McRae
1 year, 6 months ago
Thanks very much.
Reply
JT
1 year, 6 months ago
Can't think of another how-to article that has made me more thankful for not turning wrenches professionally any longer.
Reply
Mark_Todd
1 year, 6 months ago
Longtime lurker, 1st time poster here. I haven’t really thought about whether it would work for brake lines, but what worked for me with shifter housing was pulling out the cable from the old housing and then threading a heavy nylon fishing line (50kg breaking strain-ish) through both the old and the new cable, tie a knot in the fishing line at the end poking out of the new cable, tie a loop in the fishing line at the other end and pull on the loop to pull the whole lot through, the new and old cable are forced to butt up against each other.
Reply
DanL
1 year, 6 months ago
Congrats on scoring some Hopes, I had to mule mine over with my in-laws. I'll be interested on hearing how the tech4s feel leverwise.
Those tools make my think about running in wall cables an the constant fishing, but at least I could always hack, drill and replaster/repaint afterwards. The rockshox reverb barbed connector is a good non-boutique cable connector for less labyrinthine internals as well
Reply
Brian Tuulos
1 year, 6 months ago
Way too much focus on MTB aesthetics these days. Demonstrates that improvements in technology is peaking, so the consumer is now fussing about colour coding bits and hiding cables. It's like we're becoming women fussing about with our outfits on a saturday night. A MTB is a machine for a single purpose - fun. Not be be ogled.
Reply
rusty904
1 year, 6 months ago
I like reducing the number of nooks and crannies for mud to cling to, I also like not having to replace broken zip ties. It's a rare event but I have had a brake line cut by trail debris. If the routing had been internal in that situation, it would have been fine. Wiping down a smooth frame is just so much nicer than your rag getting snagged by cables and zip ties and having to floss for mud underneath.
I'll grant you the primary benefit is looks but I think there are functional benefits as well.
Reply
Andy Eunson
1 year, 6 months ago
I did damage a brake line once in 99 I think. The only time though and I’m not sure how it happened. A better solution than internal is routing the lines where they aren’t exposed to being damaged. Some manufacturers like Guerrilla Gravity (?) have a plastic downtube guard which bolts on or off to reveal the cables and hoses. I like that idea a lot.
Reply
Lu Kz
1 year, 6 months ago
Good lord, wait til you see what road bike companies are doing for cable routing on bikes like the new Trek Emonda or Madone. Euuuughhh
Reply
rusty904
1 year, 6 months ago
I hated working on the rim brake Madone with the little flappy things in the head tube. Integrated cockpits are rough.
Reply
Andy Eunson
1 year, 6 months ago
I’ve never once looked at the external routing on my hardtail and wished the cables were internal (except the dropper but it is hydraulic and hasn’t needed even a bleed in five seasons of hard use) I’ve looked at the internal routing on my Remedy and decided that my shifting isn’t that bad that it needs replacement. Other than maybe for a dropper, internal routing has zero performance benefit I can think of.
Reply
RNAYEL
1 year, 6 months ago
My previous set of Hope Tech3v4 came with braided lines (5mm?), after struggling to get them into a Specialized Enduro frame's cable routing, I just swapped out the rear hose for a traditional hope hose which is of standard internal cable diameter (4mm possibly) and it worked.
When I got my current set, I made sure they weren't braided. As for pads, I've moved to MTX Ceramic (red) pads and find that they extract a bit more power out of the brake than the stock hope pads.
Reply
GOrtho
1 year, 5 months ago
Just an FYI, this was a super helpful article for me as I am building an Arrival right now. Cables were a PITA and the Park Tool cable installation kit's magnetic ends were too big for any of the brake or cable frame openings so I wouldn't buy that set. Magnet was also mildly weak, so probably no better than what you purchased and $25 bucks more.
Reply
khai
1 year, 6 months ago
I loved my Hope Tech3 V4s when they were well bled and functioning properly but found them to be the most frustrating and annoying bleed I've ever had to do, and I did them countless times. While one could largely pin the blame on me for not being very good at it, I had poor results from shops as well if they weren't extremely well versed in servicing Hope brakes specifically. (Shout out to BikeCo in Whistler for being the best I've encountered) Nothing bleeds quite as easily as a Shimano brake, but I've happily settled on Maguras for the power, feel, and "easy enough" bleeding.
Reply
rusty904
1 year, 6 months ago
I'm a Magura guy as well but I still hate the bleed. It's the only system where I follow procedure and only get a perfect result every two out of three times and I have no idea where things went wrong. I also hate having to focus on not over tightening the EBT or cross threading mount screws into the master cylinder. The combination of cost, power to weight, and customization make them a winner for me despite this.
My last set of hopes were Tech 3 E4's and while they looked amazing, I never thought the power matched up with the size of that caliper. That and difficulty of sourcing pads caused me to move on.
Reply
T-mack
1 year, 6 months ago
The secret is after you've pushed fluid up and snapped the levers etc, install the screw and take the levers off the bar. Point the lever towards the sky and snap the lever a few more times, then reinstall. Take the bleed screw out, top up the fluid and you're done.
Reply
rusty904
1 year, 6 months ago
Interesting, I remove the caliper to bleed and always point the bleed port up, make the master parallel to the ground, make the port the highest point of the system before replacing the screws, etc but I haven't heard that trick. Like I said the way I do it works perfectly about 2/3rds of the time and the third time I have to repeat once or even twice and then it works eventually.
So you are saying after bleeding, to remove the lever, point the blade vertical, snap the levers, reinstall, and add some extra fluid through the EBT when you're done? I've got to try this tonight.
Reply
T-mack
1 year, 6 months ago
Yup! Hold it high so any rogue bubbles in the line can travel into the master. After a long day, if my brakes get mushy I'll pull the levers off and do the snap without opening the port or anything, works like a charm
Reply
rusty904
1 year, 6 months ago
Having installed countless internally routed brake lines both personally and professionally, not too many frames have given me trouble. Lack of internal guides is getting rarer and rarer these days but the ones that don't have the guides usually come from the factory with a plastic hose installed, run your guide cable through that, pull the hose through, done.
If the frame has brakes in it already, just cut the line, thread the guide cable's barb into that, and pull it through. Then you have the guide cable ready to pull through the new brake line. Jagwire foam tubing is a pretty easy install for noise dampening, just slide on from the down tube door. I also have used self adhesive neoprene foam cut into a thin strip and wrapped around the brake hose like a candy cane stripe. Stuff can be found cheap at any hardware store.
Once the brake is in the frame, I appreciate the clean look. I don't have to worry about zip ties braking, or mud clinging to an external line and sanding away at the paint underneath. It's just cleaner and more protected inside there than external.
The one exception I've found was a recent model Stumpjumper Alloy where the internal cable has to make such an abrupt turn from the downtube port under the BB and back up into the rear triangle that the guide barb just won't fit. You basically have to partially disassemble the suspension to get it in there and you still have to fish it through the chainstay.
Other than that, I don't really get all the complaints. Tube in tube internal routing is easier than external cable guides and you have to trim new brake lines anyway. Internal without guides maybe adds 5-10 minutes of extra work to a brake install and in my opinion, the benefits are worth it.
Reply
Kos
1 year, 6 months ago
I love working on my bikes, but I save this task and SRAM brake bleeding for the lead wrench at my LBS. Mostly for two reasons:
It's good to see the guys and spread the love occasionally, and bikes are so darn reliable these days that I'd otherwise slide into the "remind me who you are?" category.
And, it's so cool to watch a pro do this without a lick of trouble, in about 1/3 the time it would take me to swear my way through.
Reply
rusty904
1 year, 6 months ago
I love the Sram bleed process post bleeding edge tool. There are some extra steps involve but I have never failed to get a perfect bleed.
Reply
Tehllama42
1 year, 6 months ago
You're so right - I file this under the list of 'things I can do myself, but would take a week to recover from emotionally'
Reply
Mike Robinson
1 year, 6 months ago
I cannot believe a modern carbon frame does not have tubes built into it to run cables. That one fact alone would stop me from purchasing this frame no matter how good it is.
Reply
Please log in to leave a comment.